Water damage – whether it’s widespread or minimal – is something that many RV owners struggle with.
As you travel down the road, water gets up underneath the vehicle and can cause damage to your camper floor.
Whether you’re replacing your RV floor due to water damage, or you’re upgrading the interiors of your home on wheels with a brand new floor, the project can be quite expensive. However, it doesn’t have to cost thousands.
Costs of RV floor replacement vary, and you could spend as little as $200 or as much as $6,000 or more. The cost of repairing your rotten camper flooring depends on the square footage of the floor you’re replacing, the type and quality of flooring, and the labor involved to replace the old flooring.
Pricing Breakdown: How Much Does It Cost To Replace Your RV Floor?
As I mentioned, there are several factors that impact the cost of an RV floor replacement:
Let’s discuss each one.
Determine the Flooring Square Footage Needed
The first step in determining the cost of your RV floor replacement is the size of the space where you’ll be replacing the floor.
You may not be replacing the floor in the whole vehicle, but the different class sizes of RV will help to estimate the cost.
For example, Class B RVs are the smallest type of RV, and therefore replacing the floor in these motorhomes will be less costly than replacing the floor in a Class C or Class A RV, which are significantly larger and therefore have more floor space to cover – pun intended.
If you don’t know your RV’s square footage, the manufacturer’s website will often have this information.
Regardless, it’s a good idea to measure the space yourself – both for accuracy and because you may not be replacing the flooring in the whole motorhome.
To measure the square footage, multiply the length of the area by the width.
Choose Your Flooring Material
After you know the square footage of the area you need to cover, the next step is to choose the type of material you’ll use for the replacement floor.
Costs vary widely for different RV flooring materials, and the time and labor cost to install different materials may vary as well.
What material is best? Well, it depends on your goal. Cost and weight are also a consideration, and may affect your choice.
You may have noticed that I mentioned laminate in both of the examples above.
Many RVers these days are choosing laminate flooring that looks like hardwood throughout their RVs, for several reasons.
Not only is it pretty easy to install yourself, it’s durable, easy to clean and waterproof, making it a great choice of material in the kitchen or bathroom. You can easily swap out panels if they get stained or damaged.
Laminate planking can be covered with a nice throw rug in the living area or around the bed to make these spaces more cozy.
It is also one of the more affordable flooring material options and laminate comes in a variety of styles and designs, including planking, stone, and tile.
Most importantly, laminate flooring is very lightweight, making it ideal for use in RVs.
Now, let’s get into the costs for each different type of RV flooring material…
Laminate
Starting with laminate, since it’s so popular among camper these days, you’ll probably pay about $3 to $3.75 per square foot.
Vinyl
Another excellent option for RV flooring is vinyl, which is quite durable, but may wear down in high-traffic areas over time. Vinyl typically costs about $1-2 per square foot.
Carpeting
If you’re opting to use carpeting in part or all of your RV, there’s a variety of textures, patterns, and colors to choose from.
By nature, that means the cost can vary a lot, between $600 – $1,000 and maybe even more.
If you’re on a budget but you still want carpet in your RV bedroom, you may be able to find a large enough piece of carpet remnants.
Linoleum
Linoleum is also more on the expensive end, but it can be worth it because of its durability. This flooring material costs between $2.50 and $3.50 per square foot.
Hardwood
We’re getting into the heavier and more expensive flooring materials for RVs, and hardwood is additionally tricky because it is more prone to water damage.
A little bit, and the planks may warp. Hardwood is also pricier, and depends on the type of wood you choose, but generally costs between $3 and $7 per square foot for the wood, alone.
If you need to stain, sand and seal the floor as well, the materials will cost a little bit more.
Tile
Due to its weight, tile isn’t the best material to use in your RV, but some RVers still choose to use it in small areas like the bathroom.
Still, tile is pretty inexpensive unless you’ve chosen a high-end option, and durable glazed ceramic tile – the most popular type – generally costs $2 to $4 per square foot.
Price Out the Labor (or DIY)
After you’ve considered the square footage of the area in your RV where you’ll be replacing the flooring and chosen your flooring type, it’s time to consider the labor costs.
Depending on the type of material you have chosen and your level of skill, you may be able to install the flooring yourself.
However, I’ve included a breakdown of labor costs by camper flooring materials, so you can get an idea for the total cost of an RV floor replacement if you decide to use professionals.
Estimate Other Repairs & Total Costs
As you estimate the cost of an RV floor replacement, don’t forget that you may need more than just the flooring and the help to install it correctly.
For example, if you’re replacing your RV’s carpeting due to water damage, the subfloor (which is almost always made of wood) may also need replacement.
You may also need new floor joists if the water damage is extensive or the vehicle has been damaged in an accident, and that job alone can cost $6,000.
For the purposes of this article, however, let’s just focus on the total costs to replace your RV’s floor with professional installation:
Flooring Type | Material Cost | Installation Cost | Total Cost |
Laminate | $3 - $3.75 per sq.ft | $6 - $9 per sq.ft | $9 - $12.75 per sq.ft |
Vinyl | $1 - $2 per sq.ft | $1.50 - $6 per sq.ft | $2.50 - $8 per sq.ft |
Carpet | $3 - $5 per sq.ft | $3.50 - $10 per sq.ft | $6.50 - $15 per sq.ft |
Linoleum | $2.50 - $3.50 | $4 - $5.50 per sq.ft | $6.50 - $9 per sq.ft |
Hardwood | $3 - $7 per sq.ft | $5 - $10 per sq.ft | $8 - $17 per sq.ft |
Tile | $2 - $4 per sq.ft | $5 - $10 per sq.ft | $7 - $14 per sq.ft |
So, if you’re replacing 200 square feet of space…
That may seem like a lot across the board, but it all comes down to the extent of the damage you’re correcting, the quality of materials, how you source those materials, and how much of the installation you’re able to do yourself.
In most cases, with some research and self-learning, many RVers who are only slightly handy may be able to do the floor installation themselves.
If that’s you, the removed installation costs could mean your project costs less than $500.
When Is It Time To Replace Your RV Floors?
There are a variety of reasons to replace the flooring in your RV.
Typically, people replace their RV floors due to damage or the growth of mold or mildew, but flooring replacement may also happen if you simply want to update the interior design of your motorhome. Let’s get into each reason…
Your RV’s flooring is very old (or the age is unknown)
Unless you bought your RV brand new, the flooring has experienced some wear and tear over the years.
Even if your used RV is fairly new and has only had one owner, it may be a good idea to replace the floors as a preventative measure.
Hopefully, you did your research and you know how old the floor is, if it’s ever been damaged, and whether or not the last owner replaced it.
If it’s in pretty good condition and there are no soft spots or damaged areas, you can wait to replace the floor, but if it’s not in good condition and there are issues, it’s a good idea to replace it with a mid-priced, good quality option as soon as possible to prevent the issues from getting worse.
There is mold or mildew growing on the floor
Mold and mildew grow when moisture gets trapped in your RV floors, and it’s important to address it as soon as possible.
The good news is, the appearance of mold or mildew may not mean you have to replace your RV’s floors; sometimes, the growth is just surface-level and can be treated with a simple cleaning process.
However, if there’s mold or mildew and the flooring also has soft spots or noticeable leaks, it’s definitely time to replace the affected area, if not the whole floor.
Whether your flooring just needs a good cleaning to remove surface-level mold, or you need to do a full RV flooring replacement, it’s important to address it quickly, since breathing the air in mold-contaminated small spaces can be harmful for your health.
What’s more, letting the problem go can result in a much more expensive replacement or repair job down the road.
Parts of the floor are soft
When there are soft spots in your RV flooring, it’s time to pull it up and make some repairs – if not a full replacement.
Soft spots are a clear symptom of irreversible water damage, and they mean that either your flooring, subflooring or both are rotting.
Avoid the soft area, and prioritize its replacement as soon as possible to prevent the damage from growing and resulting in a more expensive project.
There was a leak or flood that caused damage
If your RV was victim to a significant leak or a natural disaster like a flood, a flooring replacement may be in order.
This isn’t always the case; some leaks or even flooding, if addressed quickly, may only require minor repairs or replacement of smaller sections of your flooring (after you’ve fully dried it out, of course).
If your RV was submerged or the flooring was exposed to lots of water for an extended period of time, however, replacement is probably necessary and an emergency.
Don’t live in the RV or walk on the damaged areas, and replace your RV flooring as soon as possible.
You want to update your RV’s look and feel
If you recently purchased a used RV, or you want to update your longtime home on wheels with some interior upgrades, you may want to replace your floors.
Some RVers choose to rip out the carpeting to replace it with laminate or another, more durable and modern material.
You don’t have to have damage or bacteria growing to have a good reason to replace your RV’s floor!
Does My RV Warranty Cover Floor Replacements?
As you have probably learned from this guide, RV flooring replacement can be quite expensive (although you can do the job cheaply, if you can do it yourself and source inexpensive or reclaimed materials).
It’s always a good idea to check the warranty in your RV’s owner’s manual to see if the work is covered, because you may not have to pay out-of-pocket for the whole job.
However, if you bought the motorhome from a private person or a third party (such as an RV dealership), the warranty may not apply to you.
Even if you bought the RV from the manufacturer or their approved retailers, it may have expired since brands typically only cover the first 1-3 years of ownership.
Furthermore, coverage varies, so it may only cover minor cosmetic repairs or appliances, and not major repairs like a floor replacement.
How To Replace That Unsightly Rot Camper Floor
If you’re ready to replace your RV’s flooring and you want to do it yourself, I’ve included the step-by-step process to repair your rotted RV floor to prepare it for a new so you can minimize your labor costs, but still get the job done correctly.
Step One: Determine the full extent of the damage
You may be able to visually tell where there may be water damage, but soft spots in the floor are usually the clearest indicator of water damage.
Use a tool like an awl or screwdriver to gently poke areas that appear soft, marking them as you go.
Double check the entire floor in all areas so you don’t miss anything. You don’t want to replace the flooring in the kitchen, only to find that the bathroom floor had damage as well.
It’s important to take extra care with this step, because water-damage can spread and if you replace part of the flooring and miss an area, the damage can spread to the newly-replaced flooring.
If you’re in doubt, replace more of the flooring than you think you need.
Step Two: Tear out the damaged flooring
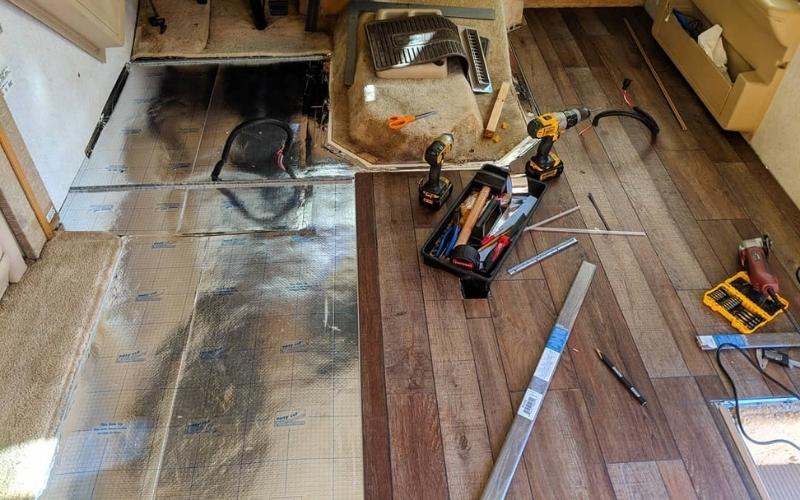
It’s Demo Day! After you know the areas where the floor is damaged, you can begin the process of removing the flooring (and possibly, the sub-floor) in all damaged areas.
If you need to rip out all or some of the sub-floor, you may need to use some jacks to raise the RV and make it easier to work on the floor.
Tear out the damaged floor, plus a margin around it so that you are sure to get all of the damage (and moisture) out of the RV.
Step Three: Dry out the RV and frame
After you’ve removed the damaged wood and flooring, it’s a good idea to let the space air out for several days.
If possible, let your RV frame air out for about a week in dry conditions, preferably while using fans and any other means of dehumidifying the trailer.
When you get down to the steps of prepping and installing the new floor, you will want the frame and subfloor to be as dry as possible.
This way, you can avoid sealing in moisture and causing future damage so soon after your RV flooring replacement.
Step Four: Apply a moisture-protecting treatment
In addition to removing any moisture, you want to take your replacement project to the next step and treat the sub-floor with a product that prevents and kills mold.
This will act as a preventative measure, as well as killing any lingering mold that wasn’t removed when you tore out the damaged flooring and aired out the frame.
There are lots of different solutions you can use, but some of the more common household solutions include water and bleach, water and grapefruit seed extract, or tea tree oil and vinegar.
You can use a sprayer to apply the solution, then let it dry for a week or two.
As you apply it, be sure to take the proper safety precautions so that you don’t breathe in any chemicals.
Be sure you’re working in an area that’s well-ventilated, and use respirators, gloves, and other protective clothing.
Step Five: Seal the sub-floor with epoxy resin
After you have sufficiently cleaned and treated the sub-floor, you’ll want to add a sealant to further waterproof the floor and prevent damage in the future.
Diluted epoxy resin is often used as this sealant, and it’s combined with a hardener to strengthen the sub-floor, fully seal it, and discourage surface mold growth.
Epoxy resin is typically used when the area is constantly exposed to moisture (such as on a boat), so for your camper, you’ll probably want to dilute it with a thinning agent like xylene, acetone, or denatured alcohol.
Here are the steps to follow:
Step Six: Replace the flooring (and wood frame, if necessary)
The resin will take a couple of days to cure, but once that’s done, you’re in the home stretch! You may need to build new floor joists or supports for the sub-floor, and you may need to make repairs to the frame depending on how bad the damage is.
Once you’re done, you should spray the new frame or joists with epoxy as well, and let it cure fully before proceeding.
After the epoxy resin is dry on both the sub-floor, frame and joists, you can install your new flooring material.
Installation steps, timing and costs are variable depending on the material you chose.
For example, you’ll need grout material for tile, and it may take a bit longer to install tongue-in-groove hardwood floors versus wood-patterned laminate.
Summary of the Cost to Replace RV Flooring
Replacing the flooring in your motorhome can be an expensive and time-consuming project, but it doesn’t have to be.
If you can do the project yourself and use affordable materials, it may cost less than $500.
And if you’re choosing to hire professional help, you should expect to pay between $1,500 and $2,500 for labor and materials.



2 Comments
Rudy Gaba
1 year agoknowany good installers in palm springs area?
NO contractors or executives pleeease.
Mitchell
9 months agoCan you have your RV Flooring replaced or repaired at the factory where it was built?