The tiny lifestyle is not for the faint of heart, but vanlife takes it a step further with even smaller living spaces.
Not only that, but your new van home will likely be on the move most of the time.
It’s crucial to design a layout that is comfortable, makes the best use of space, and also keeps your things in place when you’re on the go.
There’s no single right way to layout your van, and many elements will be more or less important depending on your own personal style of vanlife. This guide will help you to find the best layout for your camper van.
1: Consider Interior Height Before the Floorplan
When determining the best layout for your camper van, the interior height may be one of the most important factors.
This will certainly (or should) play into your decision for which camper van to buy in the first place.
Many people immediately think that a van with space to stand inside is best. However, this may limit your options in some cases.
You should think about how you plan to travel (and sleep!), and ask yourself some key questions, such as:
Still not sure? Here are some pros and cons to think about…
Pros of a Van You Can Stand Inside
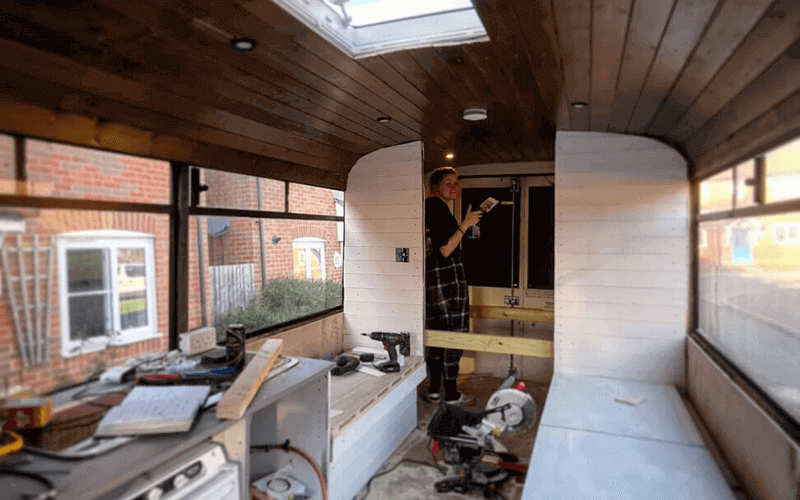
When you can stand at full height inside your van, there are a few benefits that you won’t find in a standard-height vehicle, including:
- It’s easier to cook, dress, and move around
- You have the option of having bunks, additional sleeping space, or even a ‘garage’ beneath your bed
- More interior space means more storage space, and even if your rooftop vents or solar panels are harder to get to, they’ll be more stealthy
- If you get claustrophobic, you have the option to be further away from the ceiling while sleeping
- You can stand up straight, which will be better for your posture
Pros of a Standard-Height Van
While you may be thinking that a taller van is always best, there are some reasons to consider a van with normal interior space.
Even if you can’t stand up fully, the pros of a standard-height van are:
- It’s easier to get into parking garages, car washes, and drive-throughs
- You can more easily access and pack things on the roof
- There’s greater ability to adjust your solar panels for maximum sunlight (you’ll have space for things such as articulating frames for your panels)
- A shorter van may be more stealthy in some city camping situations
- Your van will probably weigh less, contributing to better gas mileage
Even if you opt for a standard-height van, there are still some things you can do to make vanlife on a tinier scale more comfortable.
For example, be sure that you have space where you can sit up straight, even if it’s just the front passenger seat.
My partner and I purchased a body pillow to transform our bed into a lounge/sofa with our sleeping pillows.
As a bonus, it also doubles as extra insulation when we stuff it between the under-bed storage drawers and the back hatch at night.
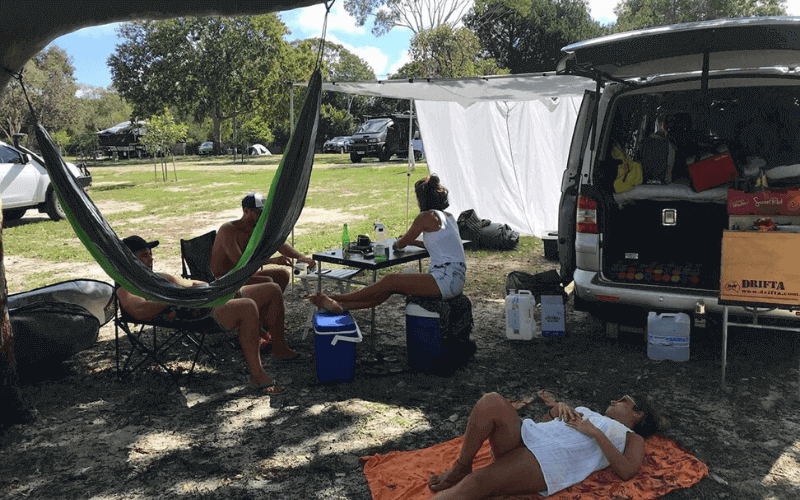
You can also arrange your habits so that you spend more time out in the great outdoors, such as adding an awning or canopy to make your outside living space more comfortable.
Consider buying some inexpensive foam padding so that you can kneel comfortably inside as well.
Finally, you may also want to look into standard-height vans that have a pop-up top for more space.
They’re less stealthy, so you probably won’t be able to pop the top in city camping scenarios, but otherwise these vans offer more comfortable interior space.
2: The Van Floorplan Should Accommodate Your Lifestyle
As with the process of determining the best van for full-time vanlife, you should always consider what your style of vanlife will actually be like before jumping into the layout design.
Here are some questions to ask yourself and things to consider before you start:
Inspiration for the Best Campervan Layouts
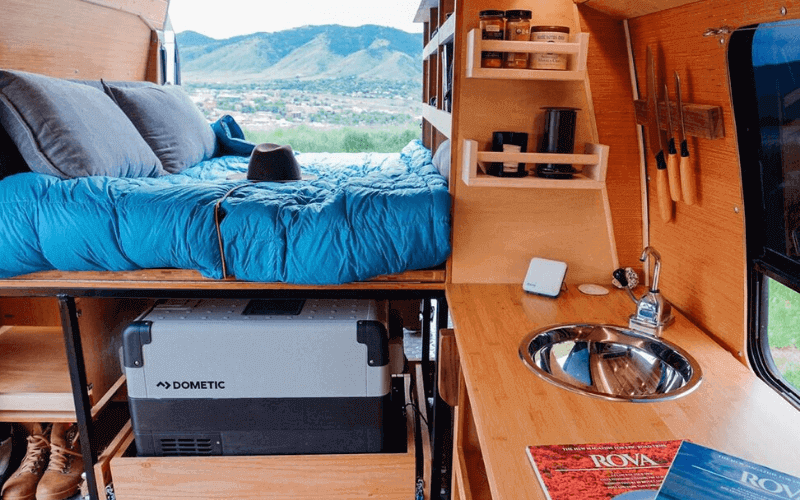
After you have decided on the interior height and lifestyle accommodations you need in your van, it’s time to hit Pinterest, Instagram, and good old Google to get some inspiration!
We have also compiled a few of our favorite camper van layouts below, to get your creative and inspirational juices flowing.
1: The Luxury Living Space
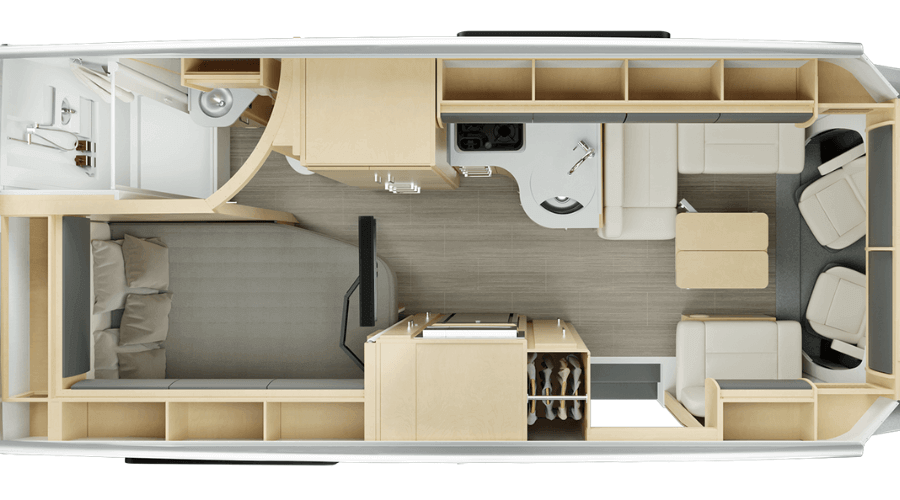
This is luxury vanlife at its best. Starting from the front, this floor plan features swivel seats that move from driving position to the dinette space, which has a table with two leaves for extra seating space.
You could create a secondary sleeping space if you make your dinette convertible.
There is plenty of storage throughout, from the closet beside the sliding door entry, to the pantry and kitchen storage and overhead compartments throughout the van.
In the kitchen space, there is a deep stainless steel sink, 2-burner cooktop, and fridge/freezer.
The bed area can convert into another lounge or even a dinette area, and versatile design is definitely in play with this plan.
The bathroom has a shower, toilet and mini sink in a thoughtfully laid out space.
2: The Classic Conversion
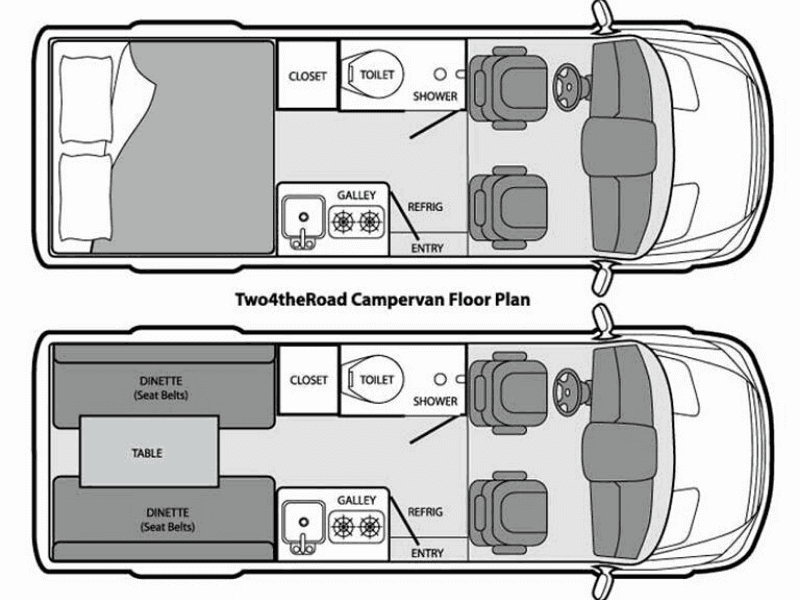
When you’re working with a small space, sometimes the tried-and-true designs are best.
This van floorplan has one of the more classic layouts for standard cargo vans.
The driver and passenger seats don’t swivel, but they could if you want more versatility in your plan.
The mini bathroom, with a shower and toilet only, are directly behind the driver’s seat, adjoined by a storage closet.
For even weight distribution, the passenger side is equipped with the galley kitchen, featuring a sink and two-burner stove with a refrigerator below.
You could design overhead storage above the sink and cooking area, and maybe a drop-leaf counter that blocks the entry while you’re cooking.
The dinette and benches in the rear convert into a large bed for sleeping at night.
3: The Classic with Garage
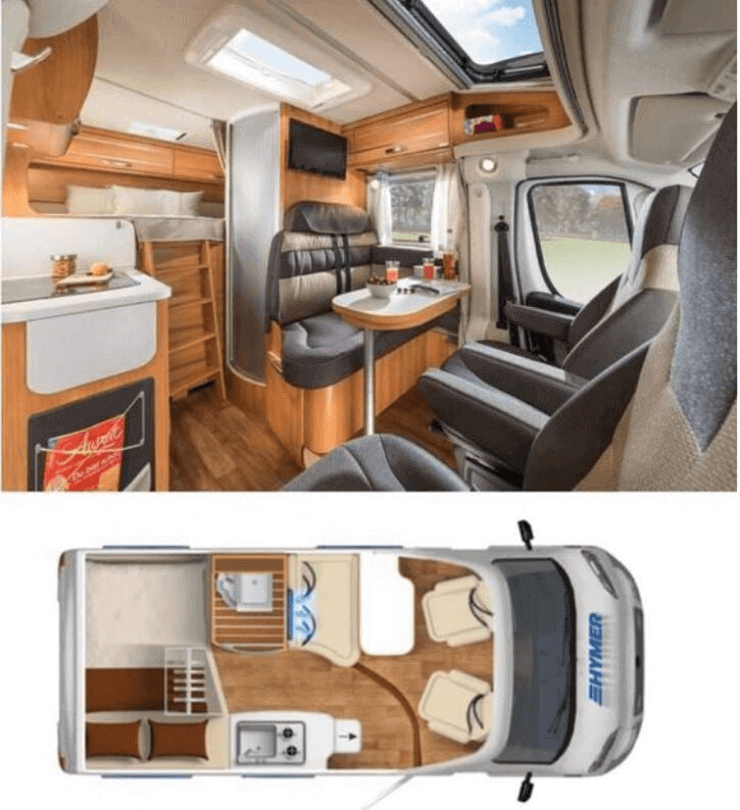
Many vanlifers are also sports enthusiasts or adventurers, and these hobbies often have a lot of gear.
Even if you’re not the outdoor adventuring type, you may want extra interior storage for tools, tanks for water or cooking gas, and seasonal clothing.
The classic conversion example above has a large ‘garage’ beneath the bed, which is accessible from the outside.
The front seats swivel into the dinette, which also has a small bench to seat two comfortably. Behind the dinette, the toilet/shower room fits snugly into a small cubby to maximize interior space.
On the passenger side, the kitchen has the standard sink and two-burner stove, with a food prep area that pulls out for more cooking space.
The fridge is conveniently placed below the cooking area. The bed is accessed by a ladder, and there’s plenty of overhead storage throughout.
There is also a clever storage drawer hidden beneath the bench seat in the dinette, and the dinette table is removeable for a comfy lounge space.
4: The Extended Sleeper
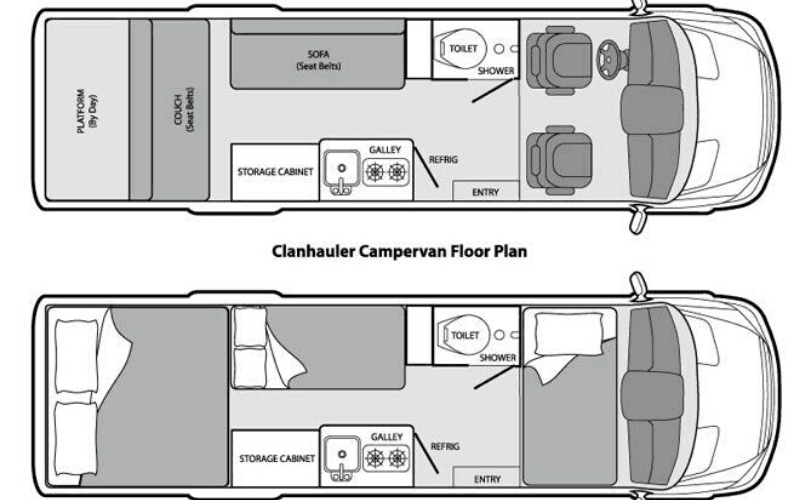
If you’re traveling as a family or you expect to have guests join you from time to time, a longer van can open up the options for additional living and sleeping areas.
This floorplan supports up to four adults, and is quite versatile as well as having all of the features you need.
The driver and passenger seat areas convert into a single bed, and there are two convertible sofas at the middle and back of the van for an extra sleeper beyond the main double bed.
The toilet/shower room is just behind the driver’s seat, and the standard galley and a large storage closet are placed on the passenger side of the van.
5: The Open-Style Cozy Cabin
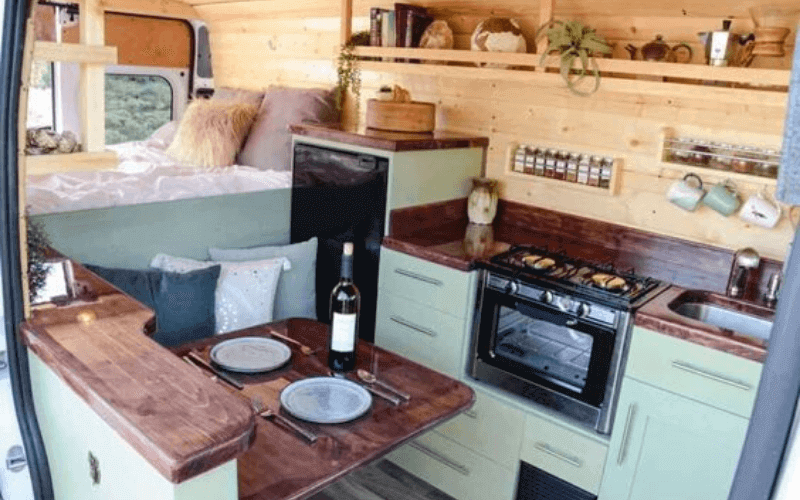
Not all vans require a dedicated bathroom. You can add a portable composting toilet for emergencies or boondocking situations, as well as a portable shower.
This layout keeps everything open and maintains a spacious feel, even though it’s not very big.
The galley with a sink, two-burner stove and even an oven are on the driver’s side, with lots of storage drawers for food and cooking gear.
The fridge is next to the bed and doubles as a bedside table surface. With plenty of height (but not too much), there’s space underneath the bed to store your mountain bikes, tools, water tanks, and more.
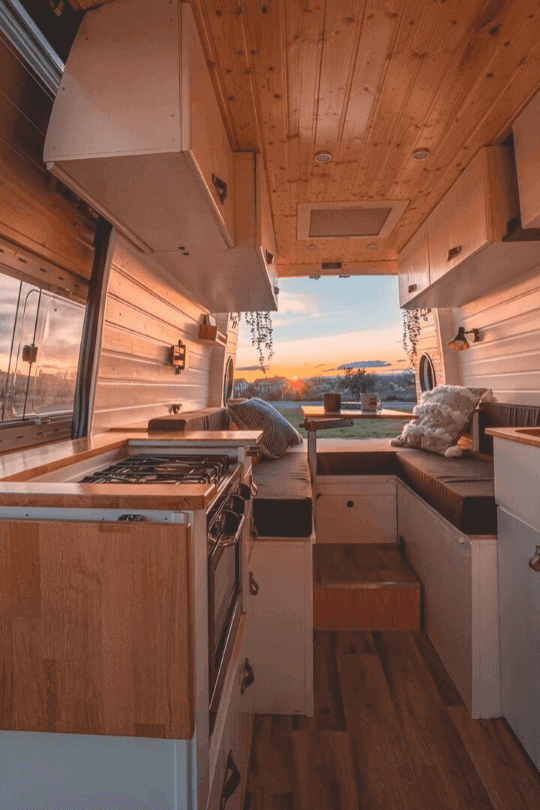
On the passenger side, a cute dinette opens to the great outdoors with a beautiful extended counter/windowsill.
Instead of enclosed overhead storage, which can make the small space feel even smaller, the shelves above the galley have subtle wood bars to keep things in place without blocking the view.
They’re perfect for plants and other decor to make your van more homey.
6: The Lounge-and-Sleep
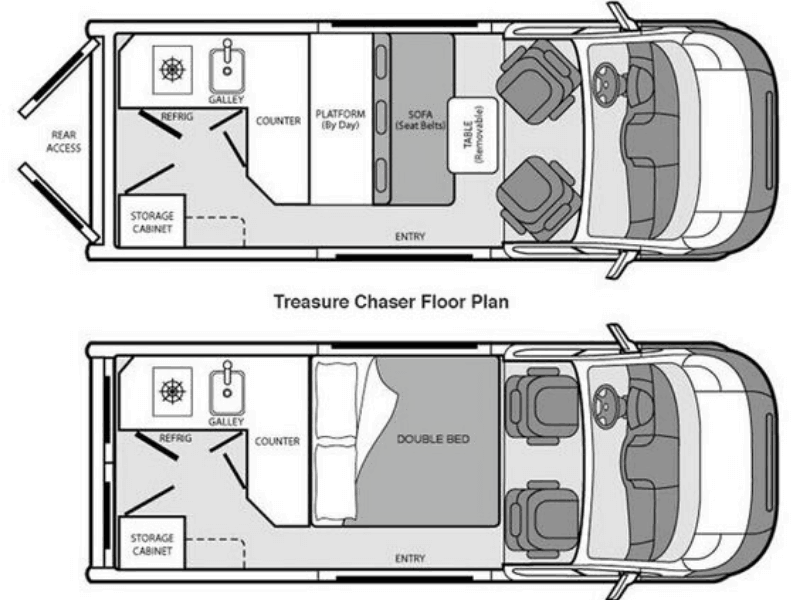
Cooking enthusiasts who don’t need a dedicated bathroom might want to use that space for more room in their van kitchen.
This layout has the kitchen at the back, with a cooktop above the fridge, a sink, and lots of food prep space.
A drop-leaf counter attaches to a tall storage cabinet on the rear passenger side for even more surface space.
The sofa, swivel seats and removable table in the dinette create a functional lounge and dining space by day, and convert to a comfy double bed at night for sleeping.
There’s an opportunity for more overhead storage with cupboards or shelves above the dinette/lounge area and bed.
If you need a toilet or shower for boondocking or longer periods on the road, you could invest in portable options to store in the rear cabinet or under the sofa and bed platform.
7: The Split-Kitchen Van
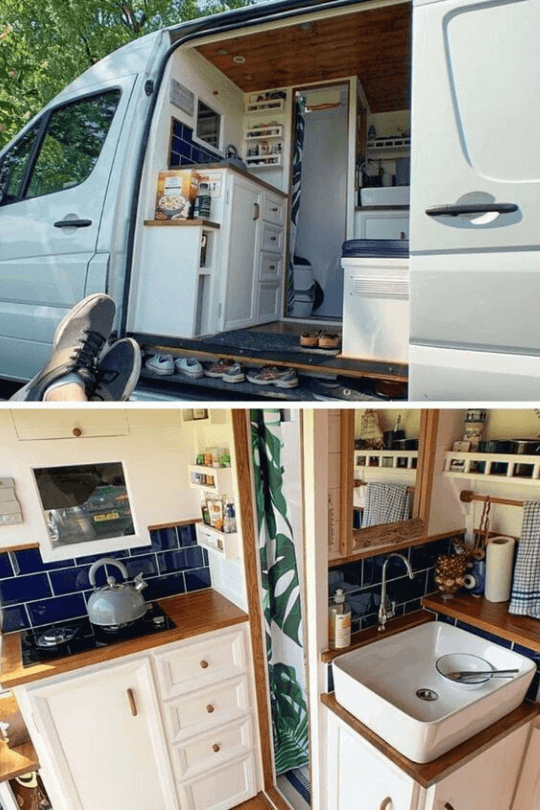
Sometimes the best layout may be a little bit unusual and even funky.
Just because a classic layout works for a lot of vanlifers, doesn’t mean that you have to follow the trend.
In this layout, the farm sink is separated from the cooking and food prep space by the shower and toilet nook.
The design has also closed off the main living space from the driving cab.
Some vanlifers may prefer this, especially if they don’t want or don’t have the option for swivel seats in the driving area.
The rest of the van is built more standard, with a dinette bench and bed in the back half of the layout.
8: The Convertible Cabin
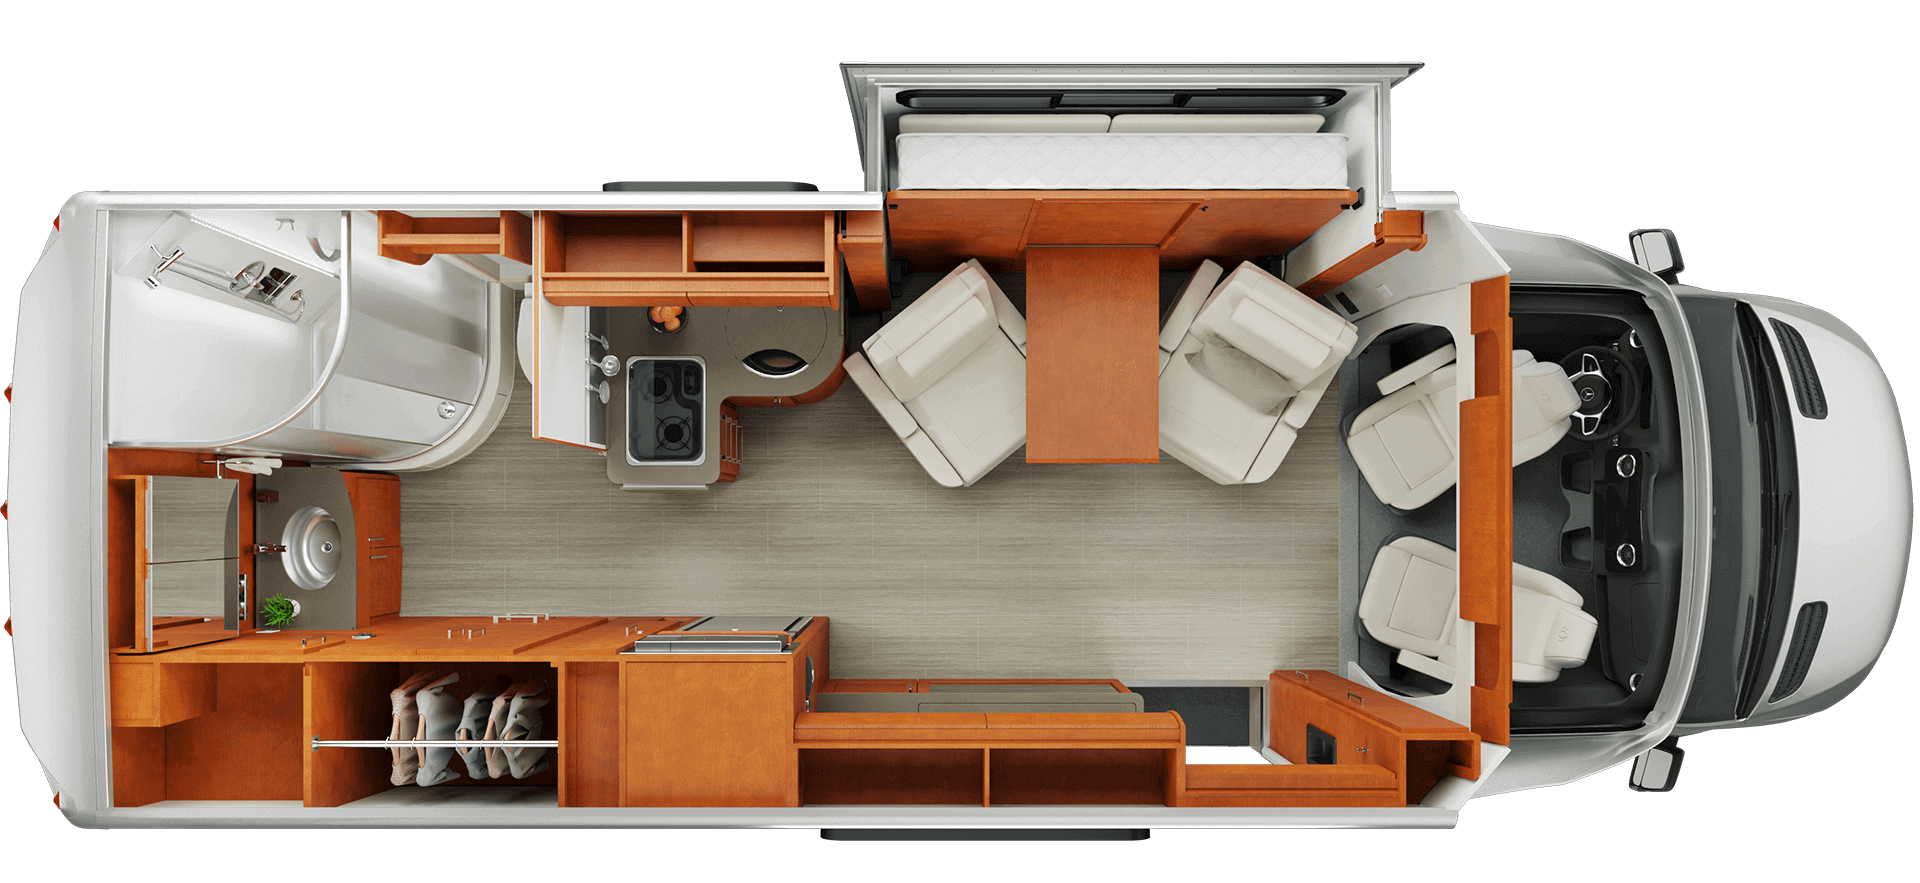
This layout encapsulates luxury and versatility all at the same time.
Not only do the driver and passenger seats swivel into the living space, but the lounge has two additional chairs and a table to maximize comfortable seating in the living area.
When parked, the lounge area pops out for even more square-footage, and a murphy bed drops down for easy conversion of the van into a cozy bedroom.
There’s a large flat screen TV across from the lounge, which flows into the kitchen area for a seamless, open floorplan.
The galley has a fridge, 2-burner stove, plenty of overhead storage, and a sink that you can cover for even more counter space.
A shower and toilet take up the space at the rear of the van, with a second sink and vanity.
There’s even a closet and lots of extra storage at the rear to organize all of your belongings.
9: The Compact Camper
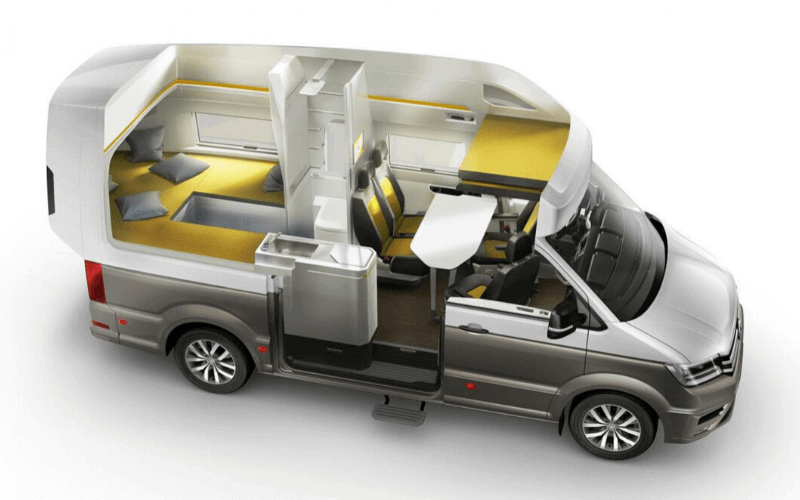
Most vans don’t have much space to work with, but this one takes compact design to another level.
The front captains’ chairs swivel back to the dinette table, with two additional seats (with seatbelts) for two more passengers.
Above the driving cab, there’s a secondary sleeping area for two kids or one adult. Behind the dinette, the mini bathroom offers plenty of space.
Across the way, the compact kitchen gives you all the room you need to prepare and cook meals.
The main sleeping area doubles as a lounge at the back of the van, with lots of overhead storage for clothes and other belongings.
The Best Van Layout Ideas for Vanlifing Families
If you’re going to be vanlifing as a family or with more than just two, it can be overwhelming to figure out where everyone is going to sleep.
Beyond that, how are you ever going to fit a cooking and living space into such a small area?
The key is multi-functional spaces that can double as living spaces as well as spots for people to sleep, and always making the most use of the space you do have.
Some ideas for van layouts that can accommodate families include:
1. Bunk Beds
One great way to use your vertical space is to design stacking bunks. In some vans, you can comfortably fit as many as three bunks and everyone will still have enough headspace.

2. Beds that double as living areas by day
Take a page out of the design that many RVs have had for years, and design your living spaces to be convertible.
Some common examples are dinette booths or the sofa bench, which can be changed into a bed for 1-2 people.
Another idea is to have a bench with storage above and below, which you can enclose with a simple curtain.
3. Murphy beds
These beds stow upright by day and drop down at night for sleeping, which is perfect for vanlife in such limited space.
Even if you have plenty of space, like you might if your van of choice is a skoolie, murphy beds maximize your living area.
Some vanlifing families even stack their murphy beds at alternating heights to provide everyone with plenty of headspace.
4. Suspended beds
A sleeping area design that’s great for couples as well as families is the suspended bed.
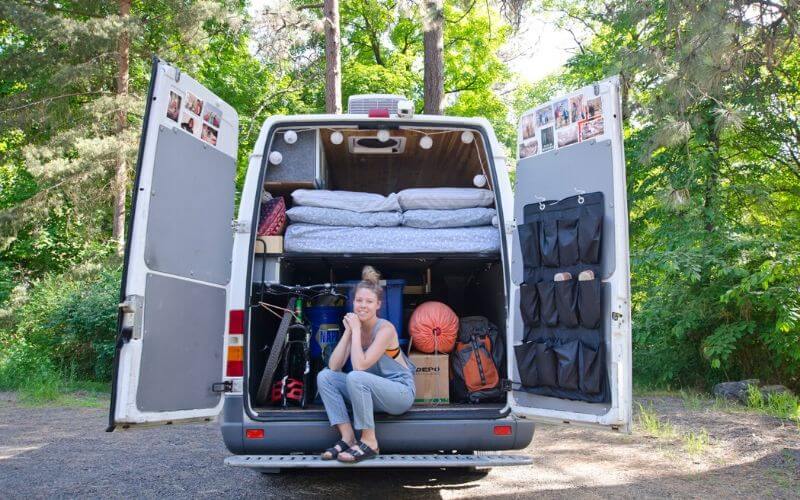
The bed is raised to the ceiling during the day for maximum living area, with a dining area, lounge, or even a ‘garage’ for your adventure gear below.
When it’s time to go to sleep, you can lower the bed with ratchet straps, a pulley or even a power jack system. Just be sure to design the bed system with plenty of support underneath!
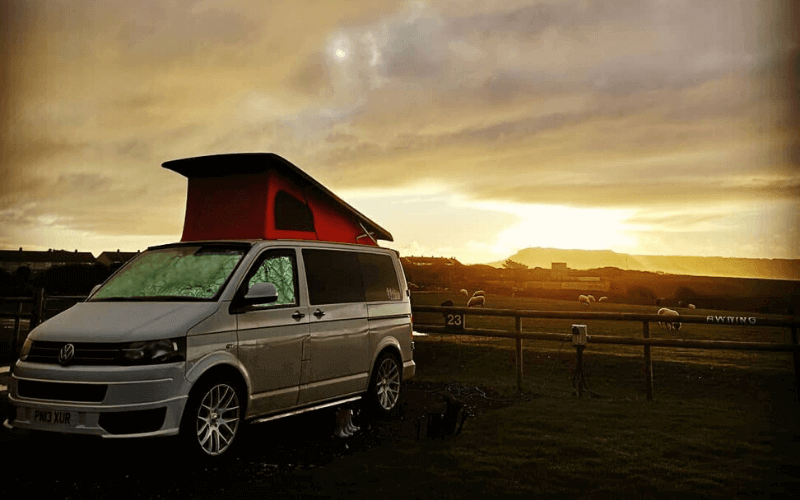
5. Rooftop tents
These functional tents are stored on top of your van. They pop up very easily and quickly, and offer space for 2-4 additional people.
They’re not very stealthy, though, so this option is better for camping in campgrounds, National Parks and federal land where camping is allowed.
Steps for Planning Your Own Van Layout
Now that you have some inspiration and thoughts about your own needs for your van layout, it’s time to start your own design.
The following are some basic steps to begin your own van design process.
1. Make a List of the Large Items
No matter what size or style of van you choose, there will definitely be some larger items that you should plan your design around, first. Some of the common items include:
- Mattress or bed
- Bathroom (or toilet/shower set up)
- Sink and cooking area (using a portable propane camping stove may be a more efficient and versatile use of space)
- Refridgerator or cooler
- Oven or microwave
- Dining area or desk
- Water tanks, propane, and your solar battery and inverter system
- Adventure gear, such as your surf board, mountain bike(s), snowboard or skiis
Don’t forget to plan space for your garbage and dirty laundry! These take up space, and you’ll want an area where you can contain the smell if you have to go a few days before taking care of chores.
Some vanlifers even bring along a portable washing machine, and if you plan to do this, be sure to plan space to store it.
2. Take Your Measurements
The next step when planning your van layout is to measure your van (or get the measurements of the van you will be buying).
Be sure to account for the necessary space for insulation (which may reduce your interior footprint by as much as 2 inches per side), wires or pipes, and interior finishes such as flooring, paneling or shiplap, tile and backsplashes.
Keep in mind that vehicle interiors are not square, unless you’ve opted for the Mercedes-Benz Luton Box Van. You’ll probably have to plan for some curves!
After you have determined which of the large items (Step One, above) you’ll have in your van, measure those, too.
Measure the full space the item requires, including any protruding knobs, power cords, etc.
3. Start Designing the Layout
A great way to play with the layout of your van’s interior space is to plot everything on graph paper.
This way, you won’t waste valuable time or money installing something important like your fridge, only to find that it doesn’t fit.
Draw the dimensions of your van onto a master sheet of graph paper.
You will want to use the squares on the paper to scale the measurements accordingly.
For example, one square on the paper equals one square inch or one square foot in reality.
It may help to tape a couple of sheets of graph paper together for your base van floorplan.
Don’t forget to mark where doors, windows, wheel wells, and other non-moveable items or features are.
Next, using a separate sheet of graph paper, draw your large items to scale as well.
This is another reason why it’s useful to have the measurements for everything beforehand.
Cut out each item, so that you can place them on the master base floorplan.
You can also use online tools if you’re not the tactile type. Lots of vanlifers use the 3D designing tool, SketchUp to plan their van layout.
It can take some time to learn, but it’s one of the easier 3D design tools to use, it’s free, and it could be a fun part of your planning process.
Once you have your graph paper design or SketchUp plan, you can begin to configure the layout for where everything will be.
Feel free to be creative! There’s no wrong way to design your van’s interior.
As you plan, keep in mind that many things can double in function if you’re smart in your planning.
For example, you can build your composting toilet or trash bin into a chair or double your dinette as another sleeping space.
You can also build your kitchen counters with a back access or swivel function against your sliding side door to create an instant outdoor cooking space.
4. Take Safety into Account
Safety should be at the top of your priority list when designing the layout of your new home on wheels.
After all, it’s a vehicle that moves, and being a small space, there are extra concerns and precautions.
For your safety while on the road or sleeping in your vehicle, you should:
5. Don’t Forget About Weight Distribution
Weight distribution is an important consideration when planning your design for a home on wheels.
It directly affects your fuel efficiency and the wear-and-tear on your wheelbase, axles and other vehicle machinery.
As you plan your layout, try to spread out the heavier items so that weight is distributed as evenly as possible.
Continue to keep this in mind as you choose your materials, since of course some materials may weigh significantly more than others.
For optimum gas mileage and vehicle maintenance, you should probably choose lighter building materials whenever possible.
Summaries About the Best Layout for Your Camper Van
As we said earlier in this article, there’s no wrong way to design your van.
As long as you take into account the important things for safety and vehicular function (such as weight distribution), you are free to use your imagination!
Keep your lifestyle and the number of travelers in mind, and otherwise, the best layout for your camper van really depends on you and your needs and tastes.


![15 Best Van Conversion Companies in [currentyear]: Top Rated Camper Van Builders 15 Best Van Conversion Companies](https://www.rvingknowhow.com/wp-content/uploads/2020/04/Best-Van-Conversion-Companies.png)