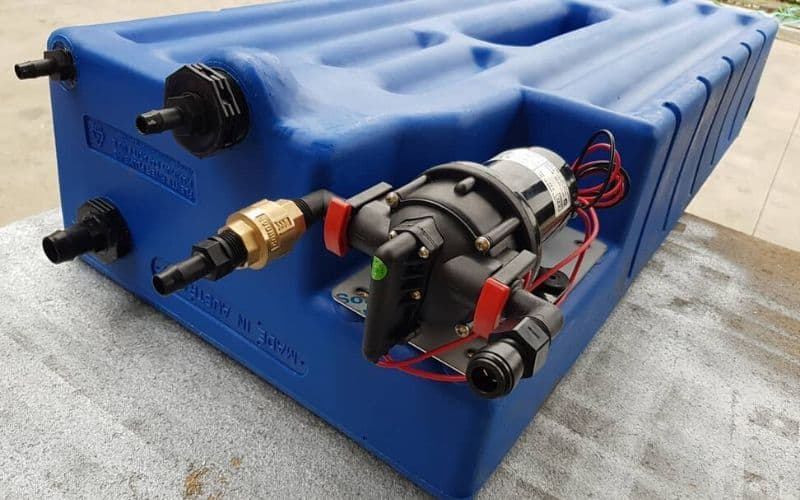
An RV water pump plays an important role in delivering water from the fresh water tank to the faucets and fixtures throughout your RV.
While they tend to have a typically long life, there are many things that can lead to a breakdown.
So, what do you do if your RV’s water pump runs, but there is no water? Chances are with a little deductive reasoning and a little elbow grease you can diagnose the problem, and perhaps even fix it yourself.
In this article, we will explore some of the more common causes of a water pump failure, and what you can do about it.
How Do I Diagnose A Water Pump Problem?
Chances are you’ve noticed the normal noise your water pump makes when it’s running. Most have a familiar low hum.
If this noise changes, or it remains the same, yet no water comes out of your faucets, there are things you can do to dial in the cause of the problem.
Even if you can’t immediately fix it yourself, doing some of the legwork might help reduce the total labor cost of bringing it to a qualified RV mechanic.
Step One: Double Check The Freshwater Tank
I know this sounds a little bit obvious, but it’s possible for a freshwater tank to spring a leak that goes unnoticed.
Sometimes a freshwater tank gauge can get stuck, telling you that you have water in the tank, when in fact it has actually run low or even dry.
If you can’t immediately tell how much water is in the tank, you can use the old fashioned dip stick method. A cheap oak dowel from a hardware store is usually sufficient.
What If My Freshwater Tank Has A Leak?
A leak in a freshwater tank can be a real nightmare when you are on the road.
A major leak that causes the tank to drain away rapidly, likely means that you are going to be without water until you can find a replacement tank, and have it professionally installed.
In the case of a minor leak in the fresh water tank, you might be able to temporarily repair it.
JB Weld and other competitor brands offer a variety of crack filler materials. You need to select the one that is right for your tank.
With most you can’t repair it while the crack is wet, so you may need to purge, empty or siphon the tank empty first.
Then you mash and knead the material together according to the directions on the package, and quickly apply it to the crack.
It’s best to do this as a two-person team. One kneads a small amount of material to activate it, then passes it to the other who applies it.
This improves the chances of the patch being malleable when applied for a better hold.
Afterward, a good old fashions strip or two of duct tape can help the repaired area hold in place.
Step Two: Prime The System
Some RV water systems need to be primed in order to deliver water from the tank to the pump, then from the pump to the faucets and fixtures.
This is especially true for RVs that need to be winterized and stored for the cold months of the year and then revitalized again in the spring.
With some older systems on smaller RVs, there might be a bulb you squeeze on the primary water line.
This essentially forces water from the fresh water tank to the pump, which then delivers it to the subordinate lines.
In a relatively new RV, priming the water system is easy. You simply open the faucet or valve that is as from the pump as possible.
Then activate the system and wait for a moment or two for the water to pressurize the lines.
You then open every other faucet along the way back to the pump. This will clear air from the system, so don’t be surprised if the faucet burp and spray a little.
Step Three: Check For Leaks In The Waterlines
Some water lines are fragile. Especially older ones that might be made from rubber without the kind of reinforcing fibers you find in modern waterlines.
As they get older, waterlines can start to leak at the connections, or even develop cracks.
When this happens in the main water line running from the freshwater tank to the water pump it can lead to a significant loss of pressure and water.
Sometimes the water is easy to spot. A telltale spraying or the massive rush of water on the floor or under the RV’s frame is likely failure in the main water line.
However, there are other times when a leak or rupture in the main water line is not so obvious. Water has a knack for following along structures.
A leak in the main water line might run along a beam for several feet, or saturate through the subfloor.
The two most likely places where the main water line might fail are at the connections with the freshwater tanks and the water pump. Yet you shouldn’t discount other parts of the line.
If your waterline runs from the exterior of the RV to the interior, this area going rub and wear down over time.
A leak here is often hard to see, so you might need to dig in with your fingers or peel back a little bit of carpet to look for wetness.
What If There’s Something Clogging The RV’s Main Waterline?
It’s also worth bearing in mind that its possible for some type of debris to get into the waterline causing a clog.
This is more likely to be a problem if you have a bad habit of letting the freshwater tank run dangerously low between fill-ups.
While this might reduce weight and save you a little bit on your miles per gallon fuel costs, it also increases the chances of tank sediment infiltrating the main water line or even the RV’s water pump.
Sediment is a natural fact of life with most water tanks. It’s also a little more likely to be an issue if you frequently fill the tank from a hard water source, or your RV’s water tank is on the old side.
Most of the time, when an RV’s main water line is clogged, the best option is to simply replace the line.
Trying to force the clog out, could just lead to water issues, or even potentially damage other components in the RV’s water system.
How Do I Replace A Waterline In My RV?
If the fault is in the main water line, you should be able to replace it yourself. Most hardware stores sell inexpensive water lines and hoses at a reasonable price.
It’s a good idea to keep a small bucket and some paper towels close by to catch any water that comes out.
It might be a good idea to bring the old line with you to make sure you get the same size and length.
While you are there, you should also invest a dollar or two in some pipe tape. Wrapping the male end of each fitting with two or three wraps of the thin white tape will help the connections to “Bite” into each other better for less chance of leaking in the future.
What If It’s Not A Waterline Problem?
Most RV water pumps have small internal moving parts. This might include a small impeller which applies a modest amount of force to the water moving through the system.
Freshwater tank sediment and over-pressuring from a connected municipal water source are two of the more common things that can cause an impeller to fail.
However, like anything with moving parts, time and wear and tear can have an effect.
If you live in an area of the country where winter temperatures routinely dip below freezing, and you didn’t properly drain or winterize your RV’s water system, ice can damage many components inside a water pump.
If you are handy and you have a decent toolset, you might be able to open up your water pump to inspect it for damage.
If you aren’t 100% certain that it’s mounted in place with a rock-solid hold, you can improvise with the plumping pipe strapping for a little added peace of mind.
Most water pumps are mounted under the RV on the frame. However, a smaller RV might have it mounted internally near the bathroom or the RV’s kitchen sink.
If you aren’t mechanically inclined or you are short on tools, it might just be a better idea to replace the water pump or take it to a professional.
If there isn’t a professional service nearby it’s not all that hard to uninstall the pump and replace it yourself.
There are several steps to doing this safely.


2 Comments
Allan
3 years agoMy pump will only pump water when the tank is over 2/3 full, once it drops below that level the pump will run but not pump water????????
Tim
9 months agoSame problem as Allan