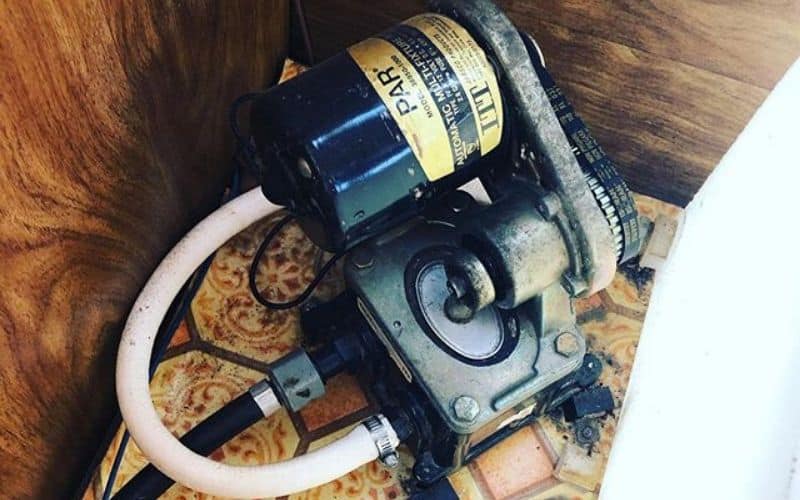
Your RV’s water pump is responsible for delivering water from the freshwater tank to the faucet, bathroom, kitchen, or washing machine.
When you are connected to a municipal source or an RV park’s water, their system provides added pressure.
Just like anything with moving parts, an RV water pump can have a problem. In this article, we will investigate common water pump problems, and how to fix them. This includes priming the water pump, dealing with a water pump leak or an RV water pump that keeps running.
The following are some common RV water pump question and answers
Why Does My RV Water Pump Sound Like It’s Running But I Have No Water?
There’s a little bit of troubleshooting that goes into addressing a problem like this. The first thing you need to do is check the freshwater tank to make sure it has water in it.
Sometimes the tank can be low, or you are parked on a gradient and the pump simply can’t access the water.
If your freshwater tank is reasonably full, you should then check the water lines for loose connections, leaks, or splits. If you’ve recently replaced or repaired something near the water line, it might have gotten kinked.
If the water lines look to be in good working order, you should then check the line that leads directly from the tank to the pump.
To do this you carefully disconnect or simply loosen it and you should find a little stream of water. If the line is dry, then the problem is a crack of a clog in the line leading to the tank.
If there is water in the line, then chances are pretty good that the problem is the water pump itself. If you’re handy, you can sometimes repair a compromised component.
A more serious problem will likely require you to completely replace the RV’s water pump.
Can I Repair My RV’s Water Pump Myself?
The first step in determining if you can repair the RV water pump yourself starts with disconnecting the outgoing line. Hold the pump over a bucket and have someone turn on the water pump.
If it releases water, then the pump itself might be fine and there is a clog that someone made its way into the water lines leading to the faucet.
If the pump drips a little but otherwise sits there dead, then chances are something has failed on the inside.
If you have the tools and technical skills, you might be able to open the water pump housing and look for moving parts that aren’t moving.
If you can find the replacement parts you might be able to replace something like a defunct impeller or a stuck valve.
If you aren’t particularly handy, or you are short on tools, you should probably see professional help. They can help you determine if the entire water pump needs to be replaced, or if they can repair the problem.
If the pump is pushing out a reasonable amount of water, then you will have to diagnose where the clog or fault is in the water line leading to the faucet.
You can do this by shutting off valves systematically while leaving one open. This will help you determine which line or if the mainline is clogged.
In some of these cases, you might want to simply replace a water line, rather than trying to fish out or push a clog through. Water lines are sold in the plumbing section of most hardware stores for a very reasonable price.
My Water Pump Was Winterized Properly But Doesn’t Work Again In The Spring
If you live somewhere that gets very cold in the winter, then chances are you need to winterize your RV’s plumbing and water system.
While this might seem pretty straight forward, there are a few minor things that you can miss, which could cause a problem when everything thaws.
The first thing to double-check is the drain for the freshwater tank. If you left it open when you tried to fill the tank in the spring, it could simply be that the water isn’t getting into the system.
Also double-check to make sure everything is correctly reconnected. While you’re doing this, you should also check to make sure all the shut -off valves are open.
When you turn on the pump is it making a noise like its running? If not, it might be a breaker. or a fuse has blown.
If all the fuses or breakers are fine, then you might want to use a Voltmeter or multi-meter to make sure you have the necessary 12 volts being delivered to the pump.
While you’re at it, double-check that the pump is grounded. Sometimes a little bit of water or condensation at the pump can rust or degrade the ground connection, preventing the pump from working properly.
If all these things check out, then chances are there was some lingering water inside the RVs water pump which expanded upon freezing and damaged a component.
In most of these situations, it’s more cost and time effective to simply replace the water pump.
How Do I Replace My RV’s Water Pump?
Most RVs are tight on space in the undercarriage. This can turn a seemingly simple repair or replacement effort into a first-class knuckle buster.
If you aren’t very handy, or you don’t think you have all the tools, there’s nothing wrong with taking it in to a mechanic or RV repair shop.
If you think you have the chops and you’ve got the tools, then you can use the following steps to replace your RV’s water pump yourself.
At this point, you can start the process of connecting the new water pump. If you can’t find the perfect replacement, chances are you can find a unit that will work just as well. Just make sure that all the connections are the same size.
Some basic pipe tape will also help make sure that you have a tight seal on all your water lines as you connect them. This will go a long way toward preventing future leaks, rusting and corrosion.
While it might sound simple, make sure you double-check that the in and out lines are connected in the correct direction.
If you have any old water lines, this is also the ideal time to replace them. When you consider how cheap waterlines are, it’s really a no-brainer!
Why Is My RV’s Water Pump Louder Than Usual?
Water pumps have moving parts and they are literally a device that mixes water and electricity. This can make them highly prone to corrosion and other problems.
Sometimes something as simple as a rusty bolt can cause the water pump to shake loose making a lot more noise than usual. Other times, a noisy water pump is a sign of a failure in one of the internal components.
If the water pump is still secured firmly in place, it’s likely something internal. It could be debris got into the freshwater tank and made it to the water pump, or it could be something as catastrophic as a damaged impeller blade.
While you are at it, you might want to also replace the water lines, or disconnect them, apply some simple pipe tape and reconnect them again.
How Do I Prime My RV’s Water Pump?
Some RV water pumps need to be primed in the spring when you take them out of winter storage. This is a relatively simple procedure that involves a few basic steps.
How Do I Repair An RV Water Pump Leak?
If your pump continues to run after you turn off a faucet or the toilet tank is filled, then chances are there is a leak somewhere in the system.
Sometimes finding the leak is as easy as noticing a wet spot. Other times a leak can be elusive and hard to detect.
The first thing to do is check all the valves, including the check valve. If the check valve is cracked, it can cause the water pump to keep running.
In a case like this, there are things you can do to repair a problematic check valve.
To install the replacement value, you will need to wrap both male connecting ends with pipe tape, and firmly turn it in place.
You might want to also consider duct taping it in place if it is just dangling loosely. This will limit how much it bangs and moves around when you drive.


1 Comment
Ron Bifford
2 years agoWhen I turned on my pump, it wouldn’t pressurize. I tried again later, and it did and worked the whole trip. On the second trip it started out not pressurizing, so I ran the cold water valve in the sink to blow out air. That worked, but when I returned later the pump was running. I ran both the hot and cold faucets to blow out air. It held for awhile then repeated. Also it seems to run louder than normal right before it shuts off. I don’t see any water leaks, but it seems like it’s getting air in the line, unless I just don’t have it all out yet. I’m thinking the pump is fine, but it’s something in the system. Any thoughts? Thanks
Ron B