To wire up a 50 amp RV plug, disconnect the main breaker. Set the outlet box in place. Correctly connect all the wires, then screw the box back on without pinching the cables. The electric panel should now have the 50 amp breaker. Test the power, turn off the breaker, and connect the RV to the outlet.
In this piece, I will guide you on how to wire up a 50-amp RV plug. But before that, I’ll explain what a 50 amp RV plug is and guide you on the necessary tools you need to plug one. Read to the last word of this article because I will also answer some frequently asked questions about how to wire up a 50 amp plug.
Before beginning any wiring, become familiar with the terms and tools used in the electrical industry. However, if you’re nervous about dealing with electricity, hire a specialist instead.
What Is A 50 Amp RV Plug?
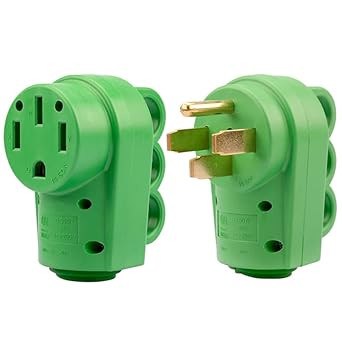
Every RV has a 30– or 50-amp plug for its power requirement. You can confirm from your RV manufacturer’s manual or check the RV manually to determine which plug your RV uses. A 50-amp power plug has four prongs on the end, while the 30-amp power plug has only three. Your RV gets 12,000 watts with a 50-amp power RV.
How is that even possible? A 50 amp RV outlet has four wires, two of which are 120-volt hot wires (one is neutral and the other is ground). You will, therefore, get 50 amps from each hot wire.
- 50 amps x 120 volts = 6000 watts.
Given that there are two hot wires, multiplying 6,000 watts by two yields 12,000 watts.
You won’t receive additional power by plugging a 30 amp into a 50 amp system (through an adaptor). Therefore, if your RV has a 50 amp system and can only access a 30 amp, you must get a 50 amp plug. A 50 amp plug will only provide 30 amps of power when used with a 30 amp system.
Remember that the electrical power system in your home might not be compatible with the one in your RV. As a result, you must adapt your home’s power supply to your RV’s 50 amp system. First, confirm that all wiring was done correctly and that you followed all the safety precautions.
Tools Required For 50 Amp RV Plug Wiring
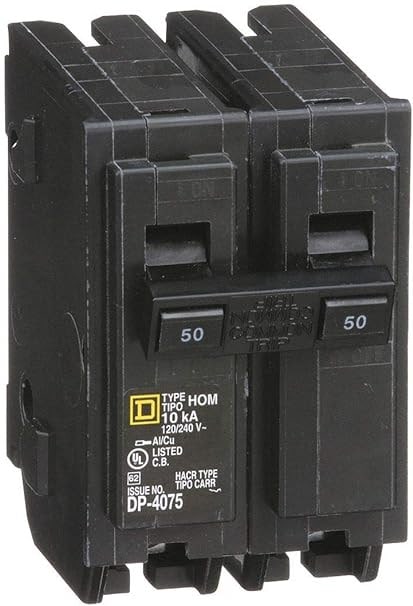
Confirm that you have everything you need to connect the 50 amp outlet on your RV before you proceed. The table below highlights all the tools and equipment you’ll need.
| Tool/Equipment | Features |
|---|---|
| 50 amp breaker | A 120/240 volt double (pole) 50 amp circuit breaker. The 240-volt service will be split into two hot feed points. |
| Both breakers are bridged in the dual breaker to trip simultaneously. | |
| There is an internal bridge in some breakers. | |
| Wire | The 6 AWG (6 gauge/3 wire) is best for a 50 amp. The cable can carry 50 amps without overheating. |
| Wire should be UF rated (indicates that the wire is appropriate for outdoor use. | |
| The wire should be long enough to connect to the power supply in your house. If your wire is within a conduit, ganged up with other wires that prevent heat loss, or your route is over 100 feet, go an inch higher. | |
| Measure the distance from where you will likely park your RV’s power source to get the correct length. | |
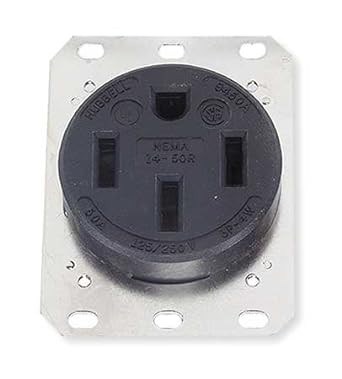
| 50 amp RV receptacle (NEMA 14-50R) | A grounded four-prong outlet with a 50 amp, 120/240-volt rating. |
| It is wired with two hot wires, one ground, but not a neutral. | |
| It is primarily used for larger appliances and has two verticle blades for the hot wire, a U-shaped pin for the ground, and an L-shaped blade for the neutral. | |
| Electrical conduit | A structure through which you can route your cables to keep things organized. |
| Soft rubber tubing that is far simpler to maneuver or alter. | |
| A solid conduit made of standard PVC pipe. A residential setup would be more suitable if you frequently charge your RV. | |
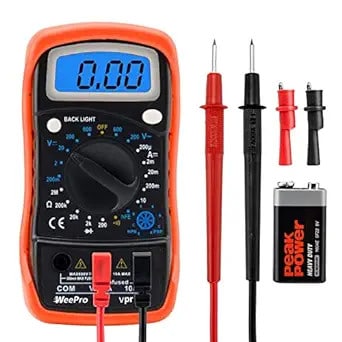
| Other equipment | A voltmeter, wire cutters, wire strippers, and screwdriver. |
| RV pedestal hook-up that is weatherproof. |
Did you know? The National Electrical Manufacturers (NEMA) is the largest trade association representing American electrical equipment manufacturers.
How To Go About 50 Amp RV Plug Wiring
You can start working after you have assembled all the tools and equipment from the table above. Remember that you need to exercise extreme caution when working with electric currents. You must carefully follow the steps below to avoid wrong connections.
1. Disconnect The Main Breaker
Before starting any electrical work, shut off and disconnect the main breaker to avoid getting an electric shock. Use your voltage meter to verify that no current is still running through. Attach the voltage meter to the circuit breaker’s output points to obtain a reading.
2. Install The 50 Amp Receptacle
To begin wiring, install your 50 amp RV receptacle (NEMA 14-50R) in the correct position. The receptacle should be where you can easily park and charge your RV. Get a cover for the receptacle to protect it from the weather elements.
You can set up a 50 amp service in two different ways.
- A wall mount.
- A receptacle mounted on an RV power pedestal (most RV parks have this option).
The pedestal is what I recommend because it offers you greater flexibility. You can place a power pedestal near where you plan to park your RV. A wall mount requires more work, like cutting into the walls as you figure out where to put it.
3. Install A 50 Amp Breaker
Install the circuit breaker for 50 amps. The 50 amp breaker will frequently just snap into place.
Attach the 50 amp breaker to your main breaker by screwing it in. You can verify that you have tightened it by slightly tugging.
4. Wiring The 50 Amp Receptacle
The back of your 50 amp RV outlet will have four terminals or four screws, which are frequently color-coded. Silver is used for the neutral wire, two brass terminals are meant for the two hot wires, and green is for the ground wire. The hot wires tend to be both black or black and red.
The two hot wires connect to the brass terminals. The green terminal, the one behind the U-shape, is where you attach the ground wire. On the silver screw, the neutral wire sits beneath the green one. Ground the green wire.
The two hotpoints frequently appear in rubber sheathing. Grab a wire cutter, an Exacto knife, or a cardboard cutter to remove the sheathing. To prevent cutting and destroying the wire, take care when doing this.
Connect the two hotpoints to your 50 amp breaker after removing the sheathing and exposing them.
If possible, route all your wires into a conduit to prevent exposure, which poses an electrical hazard. Turn the power back on after installing your 50 amp breaker, and all your wires pass through a conduit.
5. Test Your Outlet
Get a reading with your voltmeter (multimeter). However, I strongly advise using a non-contact voltage tester to check your outlet.
Here are the readings you’ll likely see from the voltmeter and what they mean.
- 240 volts are present between the hot wires.
- 120 volts are present between HOT and neutral.
- 120 volts are present between HOT and ground wires.
- Between neutral and ground, there is no voltage.
You can also plug in a surge protector, which will turn on its green light if the connection is okay.
WhyNotRV, in their Youtube channel, demonstrates how to install a 50 amp RV outlet at your home.
What Are The Safe Wiring Rules For Your RV
Working with electricity calls for particular caution. Avoid electric shocks even when doing something as easy as charging your RV. Here are some tips on safe electrical wiring.
- Before starting any wiring, carefully read the manufacturer’s manual for your RV. Consider their recommendations for the electric components of the specific RV vehicle. The RV models differ depending on their make, model, and date of manufacture.
- Turning off the main power when working with electricity is best. You must take all reasonable precautions to avoid electrical shock, which can even be fatal. Leaving your current on while you perform the process risks severe damage to your RV and surrounding property.
- When working on any electrical wiring project, wear the appropriate safety equipment, such as gloves and safety goggles. Have safety precautions tools, including a voltameter and fire extinguishers.
- Call a professional if you feel uncomfortable performing the task. Verify the person’s familiarity with RV wiring first.
Conclusion
I hope that after reading this article, 50 amp RV plug wiring shouldn’t be complicated. I still urge you to engage a professional if you are unfamiliar with installing electrical components.
Before beginning the entire operation, don’t forget to turn off the main breaker. Once the wiring is complete, check it with a voltmeter before plugging in your RV.
Frequently Asked Questions
Can you connect your RV to your home without a 50 amp plug?
While not recommended, connecting your RV to your house without a 50 amp outlet is possible. The average residential plug has 15–20 amps, which is significantly less than 50 amps.
For your RV, the 15/20 amp outlet is too low. Even your appliances (15/20 amp outlets won’t adequately power your washing, air conditioner, or dryer). You can temporarily buy a 15/20-amp adaptor for your RV.
Is a 50-amp RV plug 110 or 220 volts?
If both the male and female plugs have four prongs, a 50-amp RV plug has 220 volts. The four prongs comprise a ground wire, a neutral wire, and two hot wires at 110 volts each.

