The Ultimate Guide To Converting A Cargo Trailer Into A Camper

Updated on

Cargo and enclosed equipment trailers naturally carry a smaller initial price tag compared to fully decked-out travel trailers.

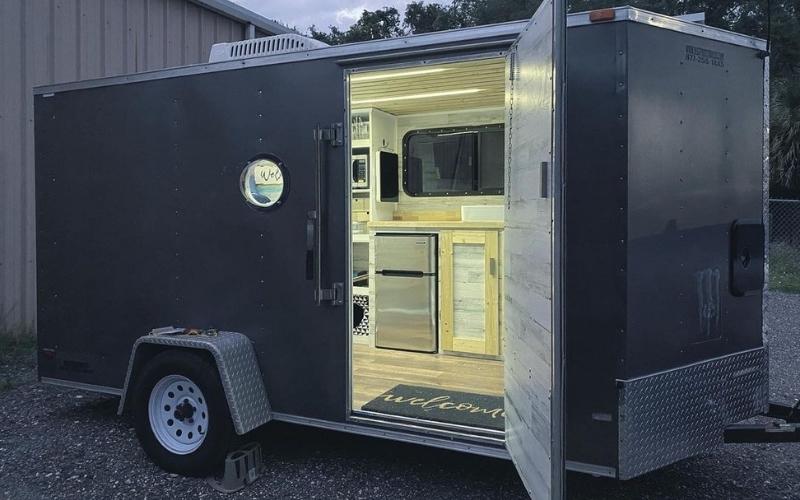
If you have one or you’ve seen a great price on one, you might be wondering if it’s possible to convert a cargo trailer into a camper?

The short answer is that yes, you can convert a cargo trailer or enclosed equipment trailer into a camper.

They are a little bit of a blank canvas, which lets you set it up how you want it, rather than the vision of an RV designer, who does their best to create a travel trailer with general appeal. 

If you’ve been thinking about making a camper out of a cargo trailer or enclosed equipment trailer, think of the following tips to whet the appetite of your inspiration. 

My friends and I have converted half a dozen enclosed cargo or equipment trailers into camper/portable fish shanties over the years.

And in this ultimate cargo trailer camper conversion gives everything you need to convert an empty enclosed trailer into an off-grid camper including cost breakdowns to step-by-step instructions for electrical plumbing, installation and cooking.

The Benefits Of Converting A Cargo Trailer Into A Camper
@davesunde

The Benefits Of Converting A Cargo Trailer Into A Camper?

Right off the bat, the cost of a cargo trailer is going to be less than buying a travel trailer of the same size.

Especially if you already own a cargo trailer or you are thinking about retiring an older enclosed equipment trailer. 

Most people who embrace a camper conversion like this do so, feel that a lot of modern travel trailer campers are overloaded with features and appliances they will seldom use, while still driving up the price.

Not to mention the inevitable markup that comes with buying a traditional RV travel trailer from an RV dealership. 

The relatively blank canvas of a cargo trailer or enclosed equipment trailer lets you install the features you want in the configuration that works best for you.

Not only can this turn out a camper that best meets your needs, but it usually costs less, and weighs less, which makes it much easier to tow.

How Much Does It Cost To Convert A Cargo Trailer Into A Camper?

Since each converted camper is a one-off unique creation the prices can vary widely. Though you can expect a cargo trailer converted into a camper to cost between $5,000 to $15,000. 

The trailer itself, if you buy it new could cost in the range of $4,000 to $5,000. Though a gently pre-owned cargo trailer or enclosed equipment trailer might be found for $1,000 to $2,500.

If you see one priced below $1,000 you should be wary that there’s something seriously wrong with it. 

Choosing The Right Cargo Trailer To Convert Into A Camper
@ramblercustoms

How To Choose The Right Cargo Trailer To Convert Into A Camper

Of course, choosing the right trailer for your conversion is an absolutely critical first step. This starts with asking and answering some important questions.

1: Deciding Between A New Or Used Trailer

A new trailer is always going to be the safest bet when it comes to establishing a platform that has very little wear and tear.

The tires are new and have deep tread, the suspension system has yet to take a pounding and there are typically zero rust issues to worry about.

However, a new cargo trailer is also going to cost more and will cost more to insure. 

A lot of people who embrace the idea of converting a cargo trailer into a camper do so because they already have the trailer.

Maybe it’s an enclosed equipment trailer that they no longer need at the job site, or maybe it’s an older, well cared for cargo trailer that is being retired in favor of a more robust one. 

If the used trailer is already paid for, or you can get it from a private buyer for a relatively low price it leaves you with a lot more wiggle room in your camper conversion budget.

You just have to make sure that the frame is sturdy and relatively rust-free.

You also need to check, or even upgrade the suspension and tires to be able to ease concerns about how wear and tear might affect your burgeoning camper creation. 

2: Check The Tires & The Bearings

If you are going with a used cargo trailer or enclosed equipment trailer, then chances are good the tires have been put on a lot of miles.

Worse still, a lot of older cargo trailers are prone to tires with a slow leak or have uneven tread on them after being driven while the air pressure was too low.

If it fits in your budget, consider upgrading to new tires. Then also go the extra mile to invest in a quality spare. That way if something ever does go wrong, you aren’t stranded.

Bearings are also one of those things that go unnoticed on a cargo trailer, right up to the point where they fail and cause severe damage.

If you are going to build your conversion camper on a pre-owned cargo trailer that is more than 5 to 7 years old, you should plan on having the bearings replaced or repacked.

Again, this is one of those peace-of-mind things that will come back to bite you at the worst possible time if you don’t take a proactive approach. 

  • The cost to replace a trailer’s bearings ranges between $100 to $400.
  • The cost for new trailer tires can range between $100 to $200.

3: The Suspension System

This is one of those things that needs to be factored into the planning stages of your camper conversion.

If you have a new cargo trailer that you are converting, you can trust that the suspension system is going to be able to support the weight rating.

If you are going with a pre-owned cargo trailer or equipment trailer for your camper conversion, then you should estimate that it’s only going to be able to support roughly 75% of what it is rated for in the specs. 

If possible, you should consider upgrading the suspension system, this might mean installing new shocks or completely replacing the leaf springs.

This is another one of those peace-of-mind things that might take a bite out of your budget but will maximize the overall weight the camper can handle.

Once you have a good idea of how much weight your cargo trailer can support, you can then compare this figure against the weight of the features and appliances you plan to install. Ideally, you want to target a maximum weight limit that is 80% of what the rated specs say.

This will ensure that your trailer doesn’t bottom out from weight or suffer a suspension failure if you load it up with camping gear for a long ride over bumpy back roads. 

  • The cost to replace or upgrade a trailer’s suspension varies from $500 to $2,500.

Do You Want Your Camper Conversion To Be A Toy Hauler?

A lot of people who convert a cargo trailer into a camper choose to use it as a toy hauler.

Especially if the cargo trailer had a folding door that laid flat for loading inventory and equipment.

If you do want to go this route, you need to accommodate the weight rating of the door.

Then make sure that your intended dirt bike, ATV, snowmachine, or other toys will fit within this weight rating. 

Even if your cargo trailer doesn’t have a door that can be used as a ramp or the rating is simply too low for the toy you want to haul, you can still get around it by using portable ramps.

Though they will need to have a dedicated place in the trailer or in the cargo box of a pickup truck tow vehicle. 

  • The cost of portable trailer ramps ranges from $75 to $200.
Choosing The Right Features & Appliances For Your Converted Camper
@hoverhomes.co

Choosing The Right Features & Appliances For Your Converted Camper 

Okay, let’s say you found or already have a conversion camper that’s in good shape and is ready for you to let loose your creative inspiration.

You’ve crunched the numbers and you know how much weight it can reasonably hold, now you need to figure out what you want to put into it.

You can weed through the following options to help you design the cargo trailer conversion camper of your dreams.

1. The Electrical System

A traditional RV camper usually has a 30 Volt or 50 Volt electrical system that can connect to a campsite or RV park’s “Shore Power.”

This can be a little bit more of a challenge to pull off for a conversion camper. Though it is possible to purchase the components and install them yourself.

This is going to be one of the higher cost options, and you will also need other critical components like an inverter.

Using Deep Cycle 12 Volt House Batteries

Another option is to set up your system to run on a bank of 12-volt deep cycle batteries.

The DC electricity they use will run the lights and a few other basic pieces of equipment.

Though you will need an inverter to power anything that runs on AC electricity like a microwave or an audio system.

You also have the be mindful that the batteries can be damaged if they are drained below 50%.

So, if you are going to invest in DC house batteries, you should strongly consider getting a battery monitor. 

  • The cost of a single RV 12 Volt deep cycle battery ranges from $125 to $250.

Using Solar Panels Or A Wind Generator 

These days solar panels and wind generators sold at the retail level are far more effective than they were even a decade ago.

Though you will need to use 12 Volt deep cycle batteries to hold the charge they produce. This can be a great option for helping maintain your house batteries above 50% of charge. 

  • The cost for a 100 Watt solar panel ranges from $75 to $160.

Installing Or Using A Generator

Generators are a great source of electrical power for times when you might want to boondock off the grid.

Even a small 2,000 Watt generator will have some AC outlets on it for plugging in important appliances or running multiple lights.

You can also use the DC electricity it produces to help recharge 12 Volt house battery packs. 

When looking for a generator to pair with your converted camper, it’s best to prioritize one with a four-stroke engine like this DuroMax XP12000EH.

Yes, the initial price tag will be higher than a 2-stroke version with the same wattage potential.

Though the 4-stroke generator will be quieter, and far less likely to break down or have carburetor problems in the future. 

  • The cost of a 2,000 Watt 4-stroke generator ranges from $450 to $1,500.

Air Conditioning & Heating

One of the glaring issues with converting a cargo trailer or enclosed equipment trailer into a camper is that there is typically little in the way of windows.

This translates into a serious problem when it comes to sleeping on hot humid summer nights.

Unfortunately, most of the roof structure on cargo trailers isn’t sufficient for supporting a typical RV rooftop air conditioner. 

One of the easiest ways to sleep cool and comfortable is to install an in-wall air conditioner directly into the sidewall or nose cap of the cargo trailer.

Though to do this, you need to properly frame out a header to ensure that you aren’t going to compromise the load-bearing structure of the cargo trailer. 

Then you can install a hatch cover made that lets you seal the hold when you are traveling.

If you are careful enough with a saws-all, you might even be able to use the original side wall section with some plywood reinforcement.

This way the converted camper is still stream lined when you drive down the road.

When it comes time to set up camp, you take the sealed hatch out and install your air conditioner to whatever power source you have available. 

When it comes to heating, your options are a little easier. Even a simple sunflower heater or buddy propane heater will get a standard 6 X 10 or 6 X 12 trailer toasty warm.

You can get one for under $100 for times when you want to camp in the mountains or use the camper as a base camp for a fall hunting trip.

Just keep in mind that you will need to provide venting and a source of fresh air. 

  • The cost for a window RV air conditioner ranges from $250 to $450.
  • The cost of a sunflower or Buddy propane heater ranges from $75 to $175.

2. Sleeping Accommodations

Sleeping accommodations are always going to be an important factor when converting a cargo trailer into a camper. Especially if you want to use the camper as a toy hauler. 

You need to think about not just the number of people you have to sleep with, but their height as well.

Someone who is more than 6-feet tall will have a miserable night’s sleep in a 6-foot long bed that is laid outside to side in a 6 X 10 or a 6 X 12 cargo trailer. 

A Murphy Bed

If you have tall family members, or you are thinking about using your converted camper as a toy hauler, you might want to consider installing a murphy bed.

They use robust piano-style hinges to fold out of the wall when you want to sleep. It’s a great way to save on floor space. 

You could easily make your own with two pairs of heavy-duty gate hinges and a three-quarter-inch thick sheet of plywood.

When it comes to the mattress, high-density upholstery foam is typically cheaper, easier to use, and takes up less space than a conventional innerspring mattress.

You can also cut it to match any size dimensions you want for a custom-size bed mattress. 

  • The cost of an RV Murphy bed can range from $200 to $700.
  • The cost to make your own Murphy bed ranges from $75 to $275.

A Convertible Sofa Sleeper

In a traditional camper or travel trailer, most seating spaces convert into sleeping spaces at a moment’s notice.

If you happen to have an old convertible sleeper sofa, or you can get your hands on one cheap, it’s a great way to have comfortable seating during the day, and storage space while traveling, while still having a reasonably comfortable bed to sleep on at night. 

The trick is making sure that the convertible sofa sleeper will fit in the intended interior space of the converted camper.

It’s definitely the sort of thing you want to measure twice to get it right before buying in on the idea.

You also have to take into account that it will likely weigh more than a Murphy bed, which will count against your suspension capacity in the long run. 

3. The Kitchen

A functional kitchen is a top priority for a lot of conversion campers. The question is just how complete do you want it to be?

Consider the following kitchen features, and take into account their weight, as well as the size.

A Range Top

You can usually pull this off by repurposing a propane camp stove. Some even have holes in the base to accommodate mounting hardware.

  • The cost can range from $50 to $350.

An Oven

It is possible to get a stand-alone oven or an RV oven and range combo to install in your converted camper.

Though ovens do tend to take up a significant amount of space and it will likely require additional venting.

  • The cost can range from $250 to $750.

A Sink

An Oven A Sink
@tihrke97

Washing your hands and washing dishes is certainly nice. Though a sink does up the ante on weight as well as plumbing.

This includes a fresh water storage tank as well as a gray water storage tank.

If you are willing to go small scale you can use a portable fresh water storage tank like an Aqua-tainer to keep 5 to 10 gallons of water near the sink.

Then you simply install a modest gray water storage tank directly under the sink. Make sure to allow enough space in your design for the drain’s gooseneck.

  • The cost of an RV sink with hardware can range from $15 to $50. 

A Microwave

This is a great way to defrost frozen foods and heat up leftovers as well as heat water for washing dishes.

The problem is that they tend to draw a lot of power, and you will need to account for that in whatever electrical system you choose.

  • The cost of a microwave can vary from $50 to $200.

A Hot Water Heater

A 6-gallon RV hot water heater can be connected to the propane tanks to give you a modest amount of hot water.

Though it does tend to take up a fair amount of space. If your square footage is at a premium, you might want to consider installing a tankless water heater.

This will give you warm water on demand and might even accommodate a shower. 

  • A 6 gallon RV hot water heater can cost between $550 to $1,000.
  • The cost of a tankless water heater can range from $550 to $1,250 with professional installation.

Do I Have To Have A Kitchen? 

The truth is, there are some conversion campers out there that simply don’t have any kind of kitchen in them.

Instead, they set up a traditional camp kitchen under a popup awning or pavilion just like you would if you were tent camping.

It saves on space and lowers the cost. You just have to endure the inconvenience of cooking outdoors in the elements. 

4. A Bathroom

Cargo trailers that are converted into campers tend to be a little short on interior space.

Not to mention installing a functional toilet or wet bath will require a lot of plumbing and wastewater storage tanks. All of which will add to the weight. 

If you plan to primarily camp at RV parks and campgrounds that offer bathroom facilities, you can probably get away with not installing a bathroom inside your converted camper.

If you plan to do a fair amount of boondocking off the grid, there are a few options to consider. Especially if you have female family members who will be camping with you.

An Outdoor Shower

This could be as simple as a “Scottish” solar shower that you hang from a nearby tree. The black plastic heats up in the sun which warms the water.

Privacy screens or a privacy tent will replicate a shower stall. You could also set up a privacy tent near the camper, and run a shower head on a hose from a water heater or a tankless water heater.

  • The cost of a solar shower can range from $25 to $100.
  • The cost of a privacy tent can range from $25 to $100.

A Toilet

The world of “Porta Potties” has come a long way in recent years. To the point where there are a lot of good options that don’t fill the campsite with bad odors.

There are even some portable composting toilets that are designed to be environmentally friendly.

The creative use of a privacy tent lets you create a toilet stall just about anywhere on your campsite. 

  • The cost of a small RV porta potty can range from $85 to $200.
  • The cost of a portable wastewater tank can range from $100 to $250.

3 Most Creative Cargo Trailer Camper Conversion Ideas

There are a lot of cargo trailers that have been converted to campers.

Though a few of the best ones on the internet stick out in memory as being excellent examples of just what can be accomplished with solid planning, the right tools and the right skills. 

These well-built enclosed trailer campers are a great source of inspiration for your next DIY cargo trailer conversion.

1. Kristi & Rogers Camper Conversion

A couple known as Kristi and Roger converted an enclosed cargo trailer to a camper in a process that took them a little more than a year and a half.

This overall labor of love ended up costing them right around $15,000. While this represents the high end of the price range for a camper conversion the end results are nothing short of stunning. 

The build makes use of a platform bed that raises the sleeping area, while still making room for an impressive kitchenette.

They used “Lifeproof” vinyl plank flooring which offers superior water-resistance as well as comfort.

Most of the cabinetry is handmade, including things like the wooden benchtops, shelves, and the dining table which is made from the premium-quality walnut butcher block. 

They also went so far as to install a portable air conditioning unit, which might seem like a lot of work and expense.

Though the climate control, it provides comfort in this converted camper into the hottest and stickiest of weather conditions. 

2. Brian’s Family Camper Conversion

With a mid-range budget, Brian set out to convert a cargo equipment trailer into a camper that would better accommodate his family’s needs compared to a small travel trailer in the same range.

After much debate, he chose to use a 12’ x 6’ Interstate Cargo Trailer as the platform for the build.

While this may have set the budget back a little more, it also provides sturdiness and a robust suspension system. 

Ultimately, Brian chose not to insulate his trailer, banking on the relatively fair California weather.

Then he hedged his bets for his family’s comfort by installing a portable air conditioner as well as an in-floor heating system. 

When it comes to the electrical needs, Brian decided to lean on a 2,000 Watt generator.

It’s a four-stroke state-of-the-art Honda generator with a reputation for reliability and extremely quiet operation.

It powers the lights as well as the RV absorption refrigerator that his family needs to keep food and other essential items cold. 

3. Pete’s Budget Camper Conversion

On the lower end of the price spectrum, we see this equipment trailer camper conversion from Pete that only put a $5,000 dent in his pocketbook.

While it is a little on the basic side, it represents how comfortable and functional a camper conversion can be on a reasonable budget. 

When we look beyond the shimmering barn door entryway we find an interior graced by close-out or clearance sale furniture.

Pete also went so far as to install a 30 Amp power system, which is what you often see in smaller travel trailers and teardrop campers.

Then he wired everything on his own with strand wire, rather than highly expensive copper. 

One of the things that really stands out in Pete’s build is that he chose to install a cassette toilet.

This is a special type of RV toilet that has its own self-contained 5-gallon wastewater receptacle.

It spared Pete the expense and added weight of installing a lot of plumbing just to have the kind of basic toilet a family prioritizes when boondocking away from a campground or RV park’s amenities.  

Frequently Asked Questions

Do I Need Jack Stands For My Converted Camper?

Unless it’s going to live on the hitch of your tow vehicle, your converted camper will likely need a pair of robust jack stands.

They aren’t always included in the original purchase of the trailer. If they are, it’s a definite bonus.

Otherwise, you should set aside an additional $50 for a pair of robust jack stands.

This will ensure that when you set up camp, you can properly level your camper and keep it level throughout your trip. 

  • The cost for heavy-duty jack stands can range from $50 to $100.

Can I Put A Woodstove In A Converted Camper?

The blank canvas of a cargo trailer or enclosed trailer does make it possible to install a small woodstove.

This is an interesting option for conversion campers intended to be used as a winter fish shanty or hunting base camp.

They can double as a range top for cooking or even doing things like roasting hot dogs and marshmallows in the open fire. 

Of course, there is a significant fire risk, that will surely void any insurance you have on the trailer.

If you do install one, you need to make sure that you are using the correct type of vent pipe and that all surfaces within 3 feet of the wood stove are insulated with cement board or another fire retardant material. 

  • The cost of a small woodstove with hardware and installation can range from $300 to $700.

Do I Need Insulation?

One of the drawbacks of converting an enclosed equipment trailer into a camper is that they typically come with little to no insulation.

This can be an issue when you are camping in very hot or cold conditions.

If you are a three-season camper, you might want to also think about adding insulation.

If you do, it’s best to use insulation panels, covered by plywood or thin wood paneling.

This will take up less space and be easier to install than rolls of bulky fiberglass insulation. 

  • The cost of insulation panels can range from $20 to $35 for a 4’ X 8’ sheet.

Conclusion

If you have the basic do-it-yourself skills and tools converting a cargo trailer or an enclosed equipment trailer into a camper can be an incredibly rewarding experience.

Not only can you customize it to your RV travel style, but it also lets you create a camper that’s generally easier to tow, at a price tag that the local RV dealership simply can’t compete with. 

If you have the budget, a new cargo trailer will give you peace of mind knowing that everything is in proper working order.

Though the cost will be higher. If you are retiring an existing enclosed equipment trailer, plan to take the time to upgrade the suspension system and replace the bearings.

These common wear and tear items have a knack for causing problems later on down the line. 

Once you have the trailer picked out, you can start planning how you want to layout the interior.

This includes taking into account key components like deciding on the type of electrical system you want, which will also factor into the type of air conditioning system you choose. 

At that point, you can select the sleeping accommodations of your choice.

If you want to use the converted trailer as a toy hauler, double-check the weight rating of the door, or invest in some after-market ramps. Then gives strong consideration to installing a custom murphy bed. 

With power, comfort, and sleeping accommodations in the works, you can start laying out the rest of your options.

Using some graph paper and measuring meticulously will also go a long way toward figuring out how and where you want to layout a potential kitchen and other comforts of home.

Join The RVing Know How VIP Community (For Free)!

Join over 10,000 VIP members to get practical, entertaining, and inspiring resources and step by step articles about RV travel Destinations, RV Gear, and full-time RV living to live Stress-Free Life In Your RV.

You can unsubscribe any time. No hard feelings


Photo of author

Written By Aaron Richardson

Aaron and his wife Evelyn have lived on the road since 2017, traveling the country in their Keystone Fuzion. They’ve sought adventure together for 5 years now and have done a lot of international traveling, including RVing in Mexico. Aaron is the co-founder of RVing Know How, where he shares their experiences and RV-related tips to make life better for other RV owners. If you’re looking for Aaron, chances are you'll find him either pedaling the backroads or hiking to sunset spots.

3 thoughts on “The Ultimate Guide To Converting A Cargo Trailer Into A Camper”

  1. Hello!
    This is neat!!! My husband and I are looking to convert his cargo trailer to a fun weekend trailer. Can you recommended any places in South Carolina that can do the work?

    Reply
  2. Thanks for the video Brian. Nice job! I’m about to start me one. Been thinking about it for a while. Great pointers brother. Y’all be safe.

    Reply
  3. Thank you for the information. I just recently completed a 6×10 conversion. Now I can justify the cost to my wife 😜

    Reply

Leave a Comment

This site uses Akismet to reduce spam. Learn how your comment data is processed.