Google Maps is an easy to use, free tool that makes planning your RV road trip seamless. Plug in destination pins for a highly visual way to get a good sense of the flow of your your next adventure. Map your itineraries, save it, edit it later, share your map with friends and then download it to your phone to use for turn-by-turn navigation.
Being part of all that Google offers makes My Maps great for trip planning, as you can quickly read destination reviews, get directions and learn about all the best food trucks or chart a path to art museums along the way. Plus, You can also calculate your trip mileage, opt for the most fuel-efficient routes and even you can find the cheapest gas station.
So, whether you are visiting a new place for the weekend or traveling across the entire country in your RV, Google Maps Trip Planner will save you time and money while planning your best holiday ever.
In this illustrated guide I’ll show you how to plan a epic and safe road trip with Google maps route planner.
Why should You choose Google Maps As A Trip Planner?
Using Google Maps for road trip planning gives you the opportunity to research an area before you go.
Gone are the days when you show up in town with a paper map and hope you hit all the town’s highlights. Now you can plan more easily for an awesome vacation.
It incorporates all things Google
Since it’s a GPS system, a business directory and has user reviews, we can use Google Maps to narrow down a list of the places that look interesting.
By reading the reviews, you can tell pretty quickly if you want to make the stop or pass on by. It’s also great that with a quick click, you can see business hours, address and phone number.
Quickly Visualize your Trip
Plotting your trip on a map helps you see how close together or how far apart destinations are.
You can quickly see an overview of the main points of your trip to know how long you want to spend in each area.
For example, if you realize you’ve saved quite a few pins all in one central area, you will be able to quickly see if you’d like to extend your time there.
The reality check of how much you can do or see in one day is quickly apparent with Google Maps.
That’s part of why I like using it so much. It takes some of the guesswork out by letting you easily see distances to places.
Customize your travel plans
Google Maps makes it super easy to customize your travel plans. Add your own important notes when planning your trip. You can color code your stops and add an icon for the type of destination it is.
When you learn about a place during your travel, you can easily drop a pin to your My Map so you remember the details.
Collaborate your plans
It’s easy to share your map with friends or family, so they can add special places to visit also. Just give them editing access and you can collaborate on the best vacation ever.
Finally, we like Google Maps because it’s easy to share between devices. I start the map on my laptop, but then send it to my iPhone for viewing on the go.
How To Plan A Road Trip With Google Maps & Google My Maps
Here’s a step-by-step guide for planning the perfect road trip or find an undiscovered gem nearby with Google Maps Route Planner
-
Create a new Google Map for your trip.
-
Add broad locations, then narrow it down by adding must-see sites.
-
Customize your map by adding colors, icons and notes.
-
Create layers to break your trip down into smaller bites: by day, by activity type, by restaurants, etc.
-
Add directions: driving, walking, biking, your choice.
-
Access on your phone.
-
Share with your family and friends.
1. Create a New Google “My Map”
First, be sure you are logged into your Google account. If you don’t have one, it’s quick and easy to set up, so go ahead and do that, then meet me right back here.
To create a new map from your Google drive, click “New”. Then click “More” and finally “Google My Maps”. This opens a brand new map, ready for you to customize.
Now give your map a name by simply clicking in the title box. A smaller dialogue box pops up. Type in your map name and give it a brief description.
You’ve started your first map! Now you can quickly start pinning places to see. For this illustration, I’m creating a map to visit Southeast Utah.
This is one of my favorite vacation places in the United States, so it’s an easy one to start showing you how to create your own customized Google Maps trip plan!
2. Start Adding Destination Pins
The next step is to click & type in the search bar to locate your first destination. This is how you’ll add destination pins to your map and it’s where the magic starts to happen!
If you have a specific destination, like a restaurant, then add it. But you can also just add the city or national park or general destination too.
Google Maps lets you enter locations by their GPS coordinates as well as by their names.
GPS coordinates come in handy for hiking trails. Usually, larger trailheads show up on the Map, but if you are heading to a secret hiking trail that your friend told you about, it may not have an official starting point. Adding the GPS coordinates will easily add a pin to your map.
Once you click the destination from the search bar, a dialogue box comes up. Notice that the pin is currently green.
Once you click “Add to Map”, the pin will turn blue. You’ll also see it populate your map contents on the left side of the screen.
Keep in mind that Google Maps gets things wrong once in a while. Hard to imagine, right? For example, you may be thinking of a museum on the east side of town, not realizing there’s a similarly named museum on the west side.
Double checking the address of specific destinations is a good habit to have from the beginning of your trip planning.
3. Customize your Pins
Now, you can either repeat the process above to keep adding destination pins. OR you can begin customizing your pins right away.
I prefer to customize them as I go, as it helps me keep track of activities. This part is all about your own preference though.
Easy organization in customized pins
I like to designate a color and icon for the different types of things we plan to do on our RV trip.
For instance, I use a green colored pin and an RV icon to indicate where we’ll stay for the night.
That might be at a National Park campground, an RV Park or even a backcountry boondocking site.
It doesn’t matter the type of camping, as I’ll still use the same green RV icon on my pin.
For hiking, I generally use a magenta colored pin with the Hiking icon. You can choose any color and icon combination that works best for you.
This is one of the great things about using the Google Maps trip planner, you can absolutely make it your own!
Even if you don’t really care about customizing your map with colors and icons, I’d still recommend changing away from the standard blue pin.
It sometimes fades into maps, like it’s a body of blue water. So changing to a brighter, non-map color makes it easier to find your pinned destinations.
Let’s see how this works:
Adjust Color and Icon
You can change a pin’s color and icon in either of two easy ways.
First hover over the destination name on the left, then simply click the paint. This opens the color and icon block. Select your color and icon.
If you don’t see the icon you want, click “More icons” for a LOT more choices.
Add your own description
Here you can also add a description to any of your destination pins. I like to make a note of must-see or -do items.
For example, everything I read about Capitol Reef National Park said that you absolutely must take time for a slice of pie at the Gifford House.
Pie and ice cream from locally grown orchards? I did not want to forget that! So I quickly made a note on my pin.
This section is a great place to make any notes about hiking trail conditions or what campground you hope to stay at. The “notes” section is perfect for customizing your Google Maps destination pin.
Add a Photo
Click the camera option to easily add a photo to your pin. From here you can select where you get the image from.
You can upload it, add an image URL, or you can pull from your photos or your Google Drive.
In addition, you can select images from a Google Image Search to keep track of items you look forward to seeing in person. And finally, you can even add images from your go-to YouTube vacation channel.
Google Maps makes adding images easy. It’s a great tool for planning your trip, but also to add a photo reminder of the places you go.
Delete a Pin
You can also quickly delete a destination pin from this same customization location.
Maybe you realize you don’t have enough time to visit all the sites you originally pinned. So click the little garbage can for a fast delete.
Another item in this section is the ability to add driving directions. It is indicated by the small arrow, which curves to the right. Let’s wait to go into the driving directions more in-depth below.
4. Create Layers within Google Maps
When you created your map, the first “layer” was created automatically. You can change it’s name by clicking in the “untitled layer” box, just like you did with the map name.
You can further customize your map with layers that display different types of information.
For instance, if you are planning a multi-day trip, simply naming each layer Day 1, Day 2, etc. helps you plan daily activities.
However, you may want to organize by which restaurants you eat at on your trip. So name a layer “Restaurants” and then save the top foodie spots under it.
Or perhaps you want to see the top lighthouses along a stretch of coastline. You then name a layer “Lighthouses” and save destinations accordingly.
There’s really no limit to the possibilities in creating your own specific Google Maps trip plan. Just get creative and plan an amazing trip!
Here’s what my Southeast Utah road trip looked during the early stages of planning:
I knew the basic places that we wanted to go, but obviously we couldn’t do all of it in one day! That’s where layers come in.
Here’s how you add layers:
To add a new layer, simply click the “Add layer” button. That’s it! Simple, right? Give it a new name and start adding destinations.
Add Destination Pins to your Layers
Move a pin between layers by hovering your mouse over it until you get the four way arrow meaning you can move something.
Then drag the pin down to the new layer. This took me a couple tries to figure out, so be patient with yourself and it’ll work out fine.
In addition to moving pins between layers, simply click anywhere within the layer box to add pins directly to that layer.
You’ll know you’ve clicked in the correct layer by seeing the blue bar next to it.
Should you make more layers or create a new Google map?
Here is another personal preference. For me, I like to add layers to one map for each trip I plan. But you may prefer having fewer layers and instead just creating another map.
You can only create up to 10 layers per map. However, sometimes you may need more. So that’s when making a second map comes into play.
Some people like having a separate map for each day of their RV road trip.
Others may like having separate maps for different types of activities. So instead of creating individual layers for lighthouse visits, like in my earlier example, you may find it more effective to simply have an entire map devoted to lighthouses.
There’s no right or wrong option here. It’s your trip and your planning preferences.
5. Add Directions to your Googles Maps Planning
Okay, you’ve now created a map, set and customized your destination pins, then added some layers.
Next we’ll add directions from one point to the next. Keep in mind that adding directions to your My Maps plan is strictly for the purpose of planning routes.
When you access the map from your phone, driving directions are not live, so you’ll still need to plug destinations into your Google Maps app.
I’m not sure why the functionality doesn’t exist but I believe it’s simply because real-life plans change.
For instance, say you stop to get gas, then someone tells you about a great place to eat a few blocks away. Now you’re in a different location, so your pre-planned directions are off.
For me, I add directions during travel planning in order to see the entire RV road trip route.
I think of it in terms of a big picture overview, while the actual daily driving is a narrowed down view of the vacation’s navigation.
How to add Trip overview directions
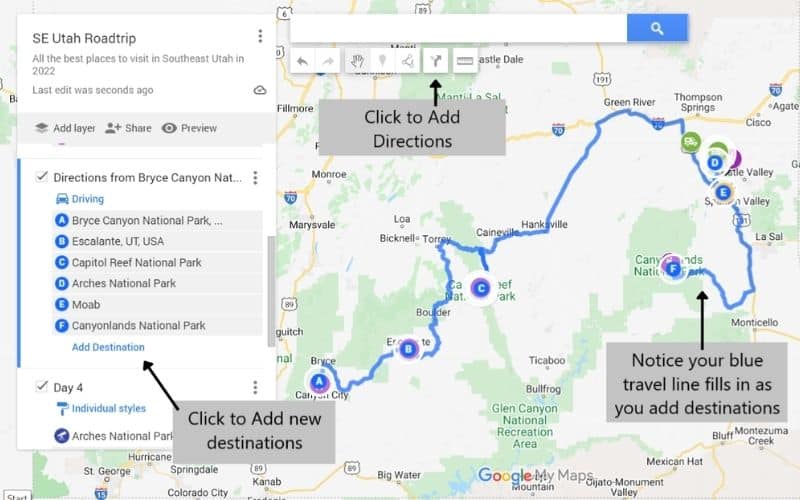
To add driving directions to your planning map, click the Add Directions icon at the top of the map, under the search bar.
It’s the little arrow, which curves towards the right. A new layer will automatically be added to your map. I usually name it, “Trip Overview Directions” or something similar.
Now click inside the box for Destination A to highlight it. Then simply click on any of your map’s destination pins.
That location will populate inside Destination A. Now click a map pin to populate Destination B.
Click Add destination to add further stops along your path. Since I use this function simply for planning, rather than driving, I generally only add the main points of my trip.
For example Bryce National Park to Escalante, Utah. I’ll see many smaller spots within those two locations, but I can plan them separately.
How to add daily itinerary directions
The step-by-step process for adding daily itinerary directions is the same as that for a trip overview. You can easily use this planning tool to work out logistics for daily side trips.
You can even change the directions from driving to walking or biking for getting around town easily.
Planning your RV trip ahead through adding map directions helps you to maximize your vacation time. You won’t spend time back-tracking as you’ve already prepared a game plan.
View step by step directions for your RV trip
Easily view the step by step directions for your trip by clicking the three little buttons next and select “Step-by-step Directions”. A dialogue box opens to show the directions for your trip.
Adjusting your route
Even though Google Maps finds the shortest trip between two destinations, you can make changes as necessary.
We generally try to avoid major interstates. Instead we prefer the slower pace of state highways that meander through small towns.
6. Access Your Google My Maps from your Phone
Here are the steps to easily access My Maps on your cell phone. I use an iPhone, so Android may be slightly different.
Accessing driving Directions from your Map
Like I mentioned above, there currently is no functionality to get live driving directions from your saved My Maps.
I don’t see this lack of functionality as a negative however. Instead I think preplanning is still beneficial, because you can use those waypoints to drop into your phone app for live navigating directions.
There are a couple of easy ways to share your map with friends and family. Like I mentioned above, when viewing your map from you cell phone, just click the share button.
Then you can text it, email it or add it to Pinterest, Instagram or other social media. You can even add it to one of your Reminders lists, although I’m not sure why you’d want to!
For Social Media or Website: On your computer, sign into My Maps. Click Share from the thumbnail of the map you want to share (it’s the little arrow button).
Then follow the prompts to share on Facebook, Twitter, via Email or to embed on your website. The onscreen directions will walk you through the process.
To Share with Friends: Again, from My Maps, go ahead and open your map. Click the Share button, then decide how you want to share it.
A new feature from Google is that you can take credit for your map by adding your name and profile picture when sharing it. Just toggle it off, if you’d rather not have your deets connected.
So that’s it! All the details about how to plan your RV trip using Google Maps. I hope you’ve found this guide useful and that you’re now busy creating all your own maps.


![The 6 Best Compact and Portable RV Dishwashers in [currentyear] 24 The Best RV Dishwasher](https://www.rvingknowhow.com/wp-content/uploads/2022/05/The-Best-RV-Dishwasher-150x150.jpg)


